

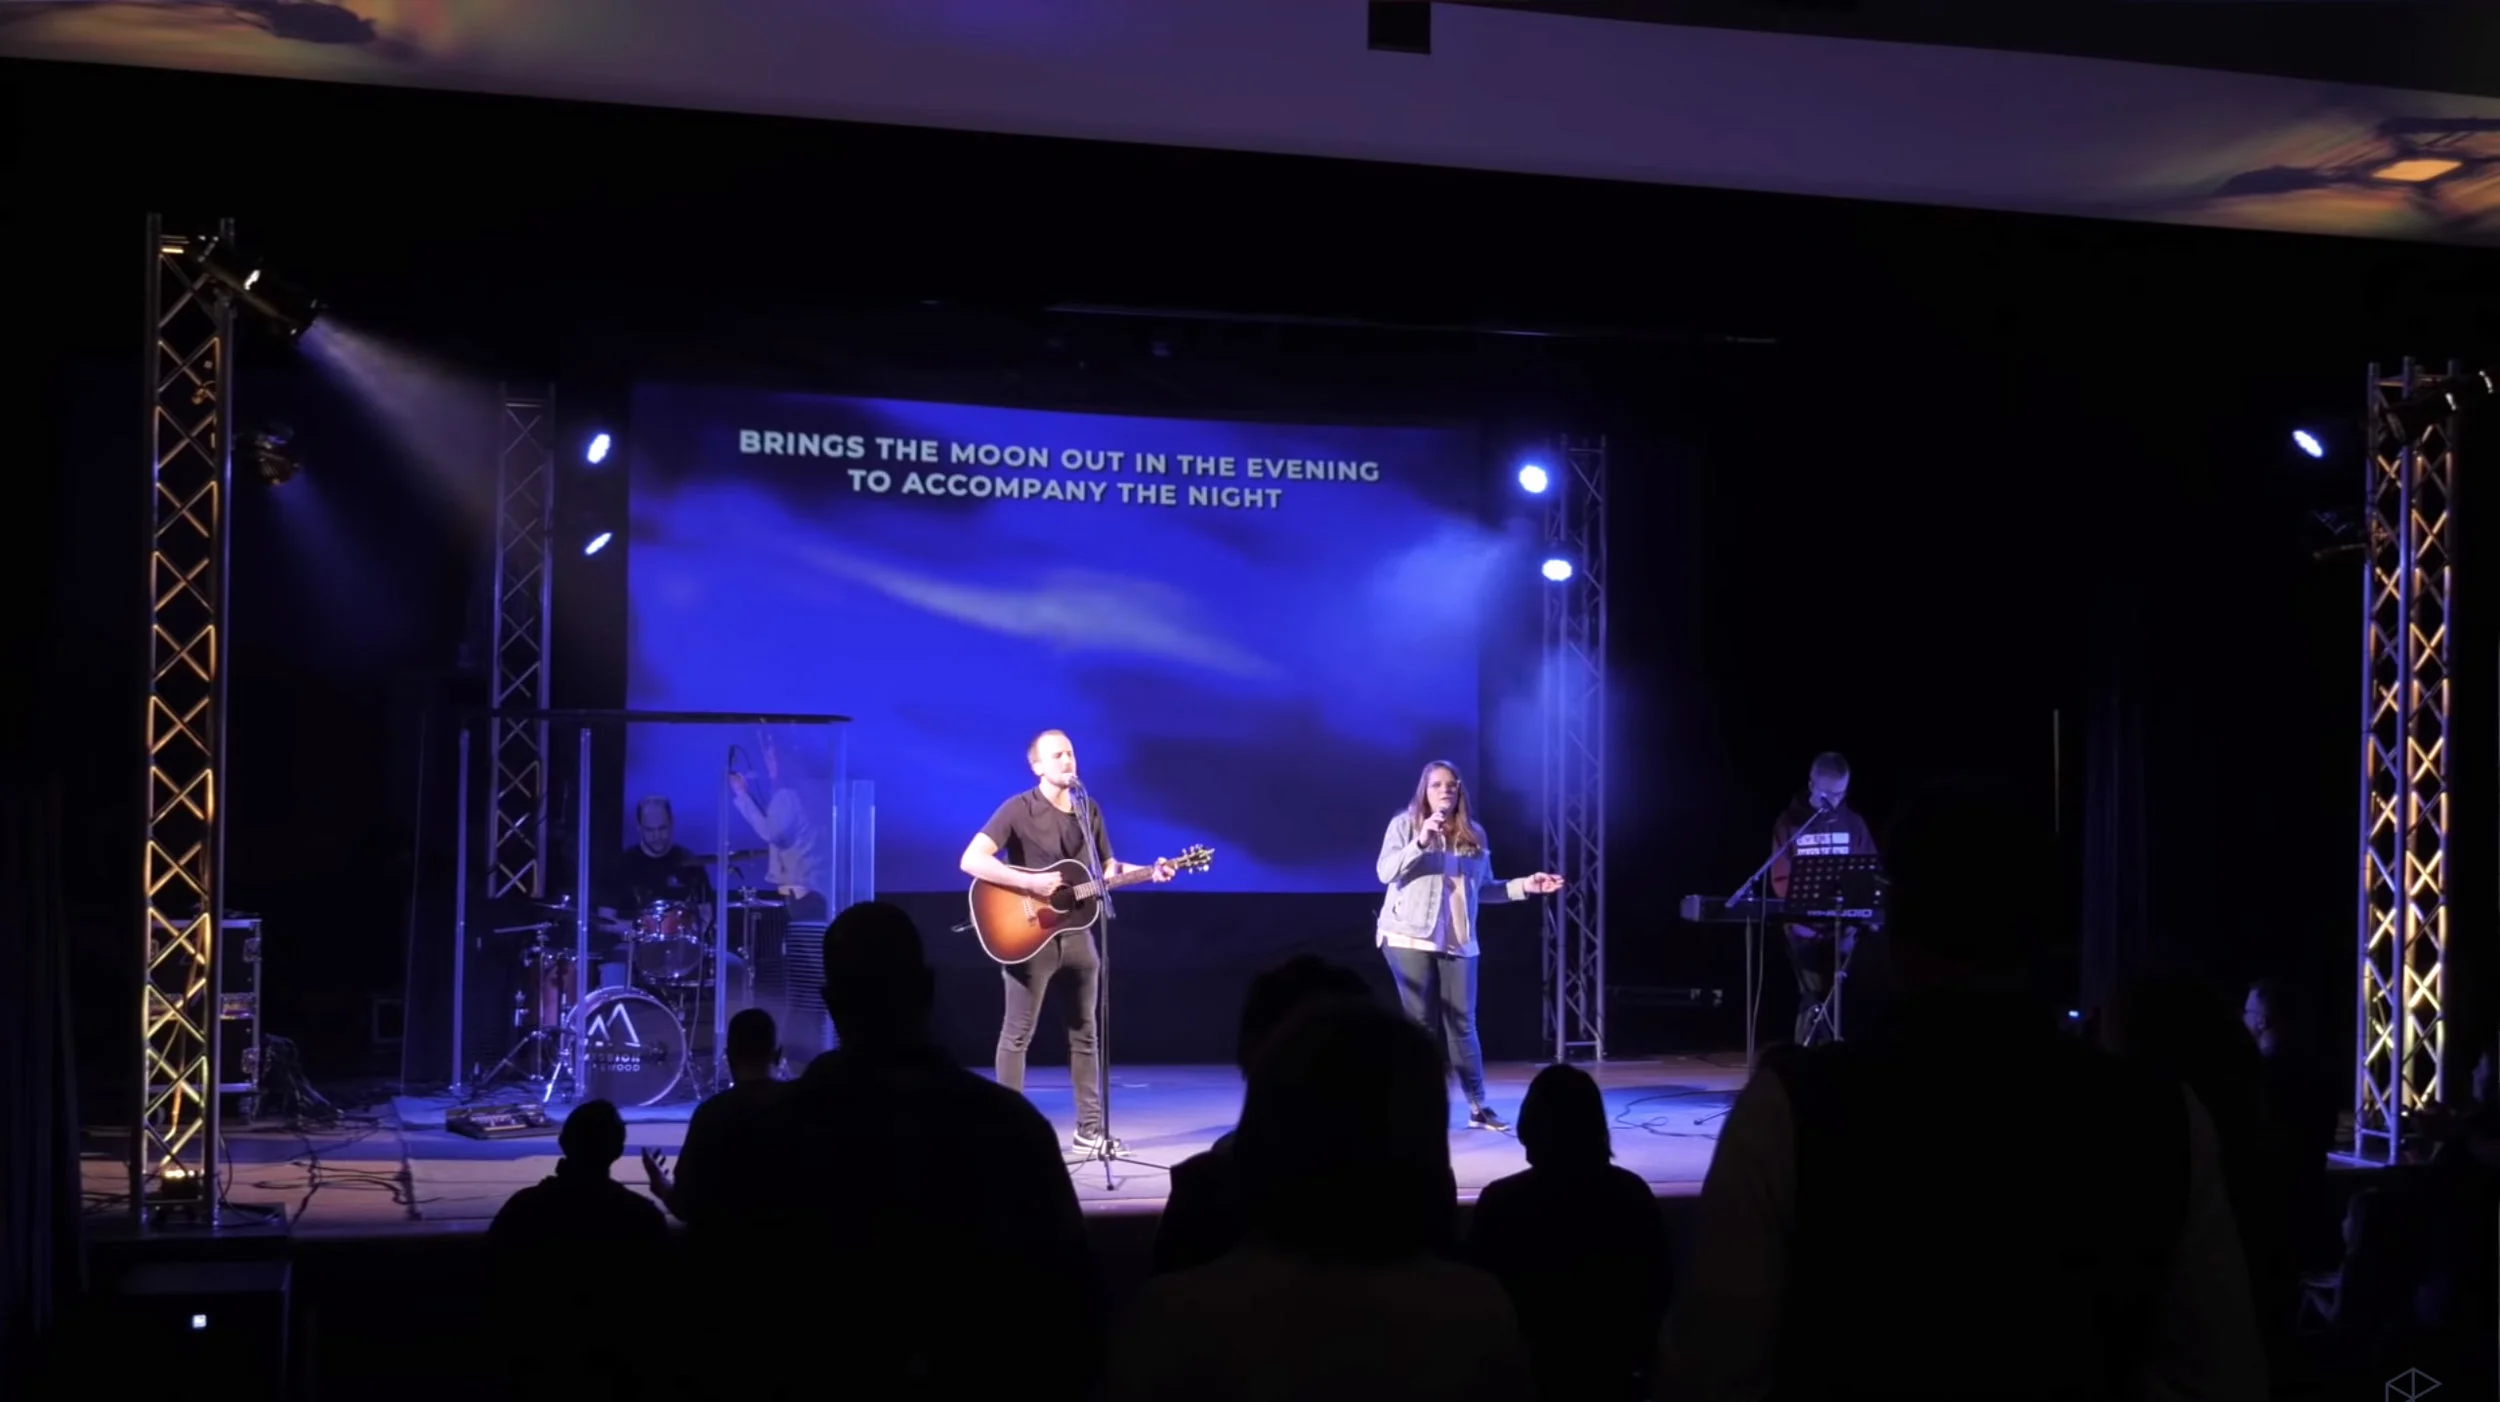
One of the most basic elements for worship is the screen. It’s a piece of equipment that’s often taken for granted, but it’s so essential to have high quality video display in worship because that's how the congregation is able to follow along with the service, watch videos, view announcements and see the lyrics.
When I started leading worship at Mission Lakewood Church, my team and I needed to find a reliable, durable and high-quality screen. In an ideal world, my worship team and I would have fifty-thousand dollars like all the megachurches to spend on a LED wall.
But we’re not there yet. We’re a small church plant. We needed a much more affordable option.
Since we don’t have fifty grand laying around, my team and I came up with a much cheaper, solution while still maintaining the quality and reliability of an expensive screen. We’ve been using it for over a year now and we couldn't be happier with the results we get week in and week out.
In this article I’m going to talk about a projector and screen solution for churches that’s:
✅Easy to set up and tear down
✅Budget-friendly
✅Looks great
Design
I’ve noticed that most churches are opting to use a single, large screen rather than setting up lots of different set pieces and monitors. I use this minimal approach at my church because that way I only have to adjust one element in worship which automatically alters the entire color, look and feel of the stage within seconds.

Equipment
Since we’re a set-up and tear-down church that meets at a high school, we designed our stage to be really simple. I’m going to highlight the trusses and baseplates first since they’re the foundation of everything else on stage.
The foundation
We only use four trusses to mount our lighting and screen.
2 trusses are downstage with just the lights.
2 trusses are upstage where we mount our large widescreen.
Trusses
We found some 11.5 ft, aluminum trusses at B&Hphoto.com. They’re lightweight and easy to lift so we’re not wasting a ton of man-power on moving them around.


Base plates
These vertical trusses stand on 30x30 in base plates. They're very thick aluminum, so they're weighted, and they keep those trusses nice and stable. I would even recommend getting some sandbags if you want more stability on those truss plates.

Cost for the trusses and base plates
Each of the vertical trusses and their base plates combined are 350 dollars, so for all of these trusses and base plates it was $1400.
Screen

Like I said, we're a scrappy church plant, so we were willing to spend a few hundred dollars–maybe a few thousand dollars–on a screen but it wasn’t reasonable for us to go above that.

Fortunately, I connected with from another church planter friend of mine, Josh Shaw at Lighthouse Church, who told me about a website called Carl's Place which creates DIY projection screens. Ordering the kit was much cheaper than a lot of screens out there and really simple.
We went to the projection screen kit section of the website,
selected the kit that's a 16x9 ft. rear projection screen.
They sent us the screen fabric with all the little grommets around the edge, so you can easily mount it with bungees to the frame.
Then they also send you the hardware that pieces together the frame, like the corners of the frame as well as the other pieces of the hardware.
And then you also get the bungees that actually connect the screen grommets to the frame itself.
They don’t send you the one inch piping. Carl's Place saves you money by sending you to your own hardware store. They give you all the instructions and how long the pieces of piping need to be. Then you just go to your hardware store and get the piping cut cut to the right lengths.
Assembling the Screen
Once you have your shipment from Carl's Place arrive and have all of your piping cut, it only takes 15 minutes to assemble it.
(Ok, maybe it's gonna take longer the first time. I know it took us quite a bit longer those first couple of weeks as we just figured it out, but now it just takes a few minutes for a small team to assemble it.)
Step 1: Make the frame
The first step in assembly is to assemble that frame. We inserted the piping into the corners and the linking pieces that Carl's Place sent us.
Then we tightened those pieces together with the wing nuts and the bolts they sent us.

Step 2: Unfold and attach the screen
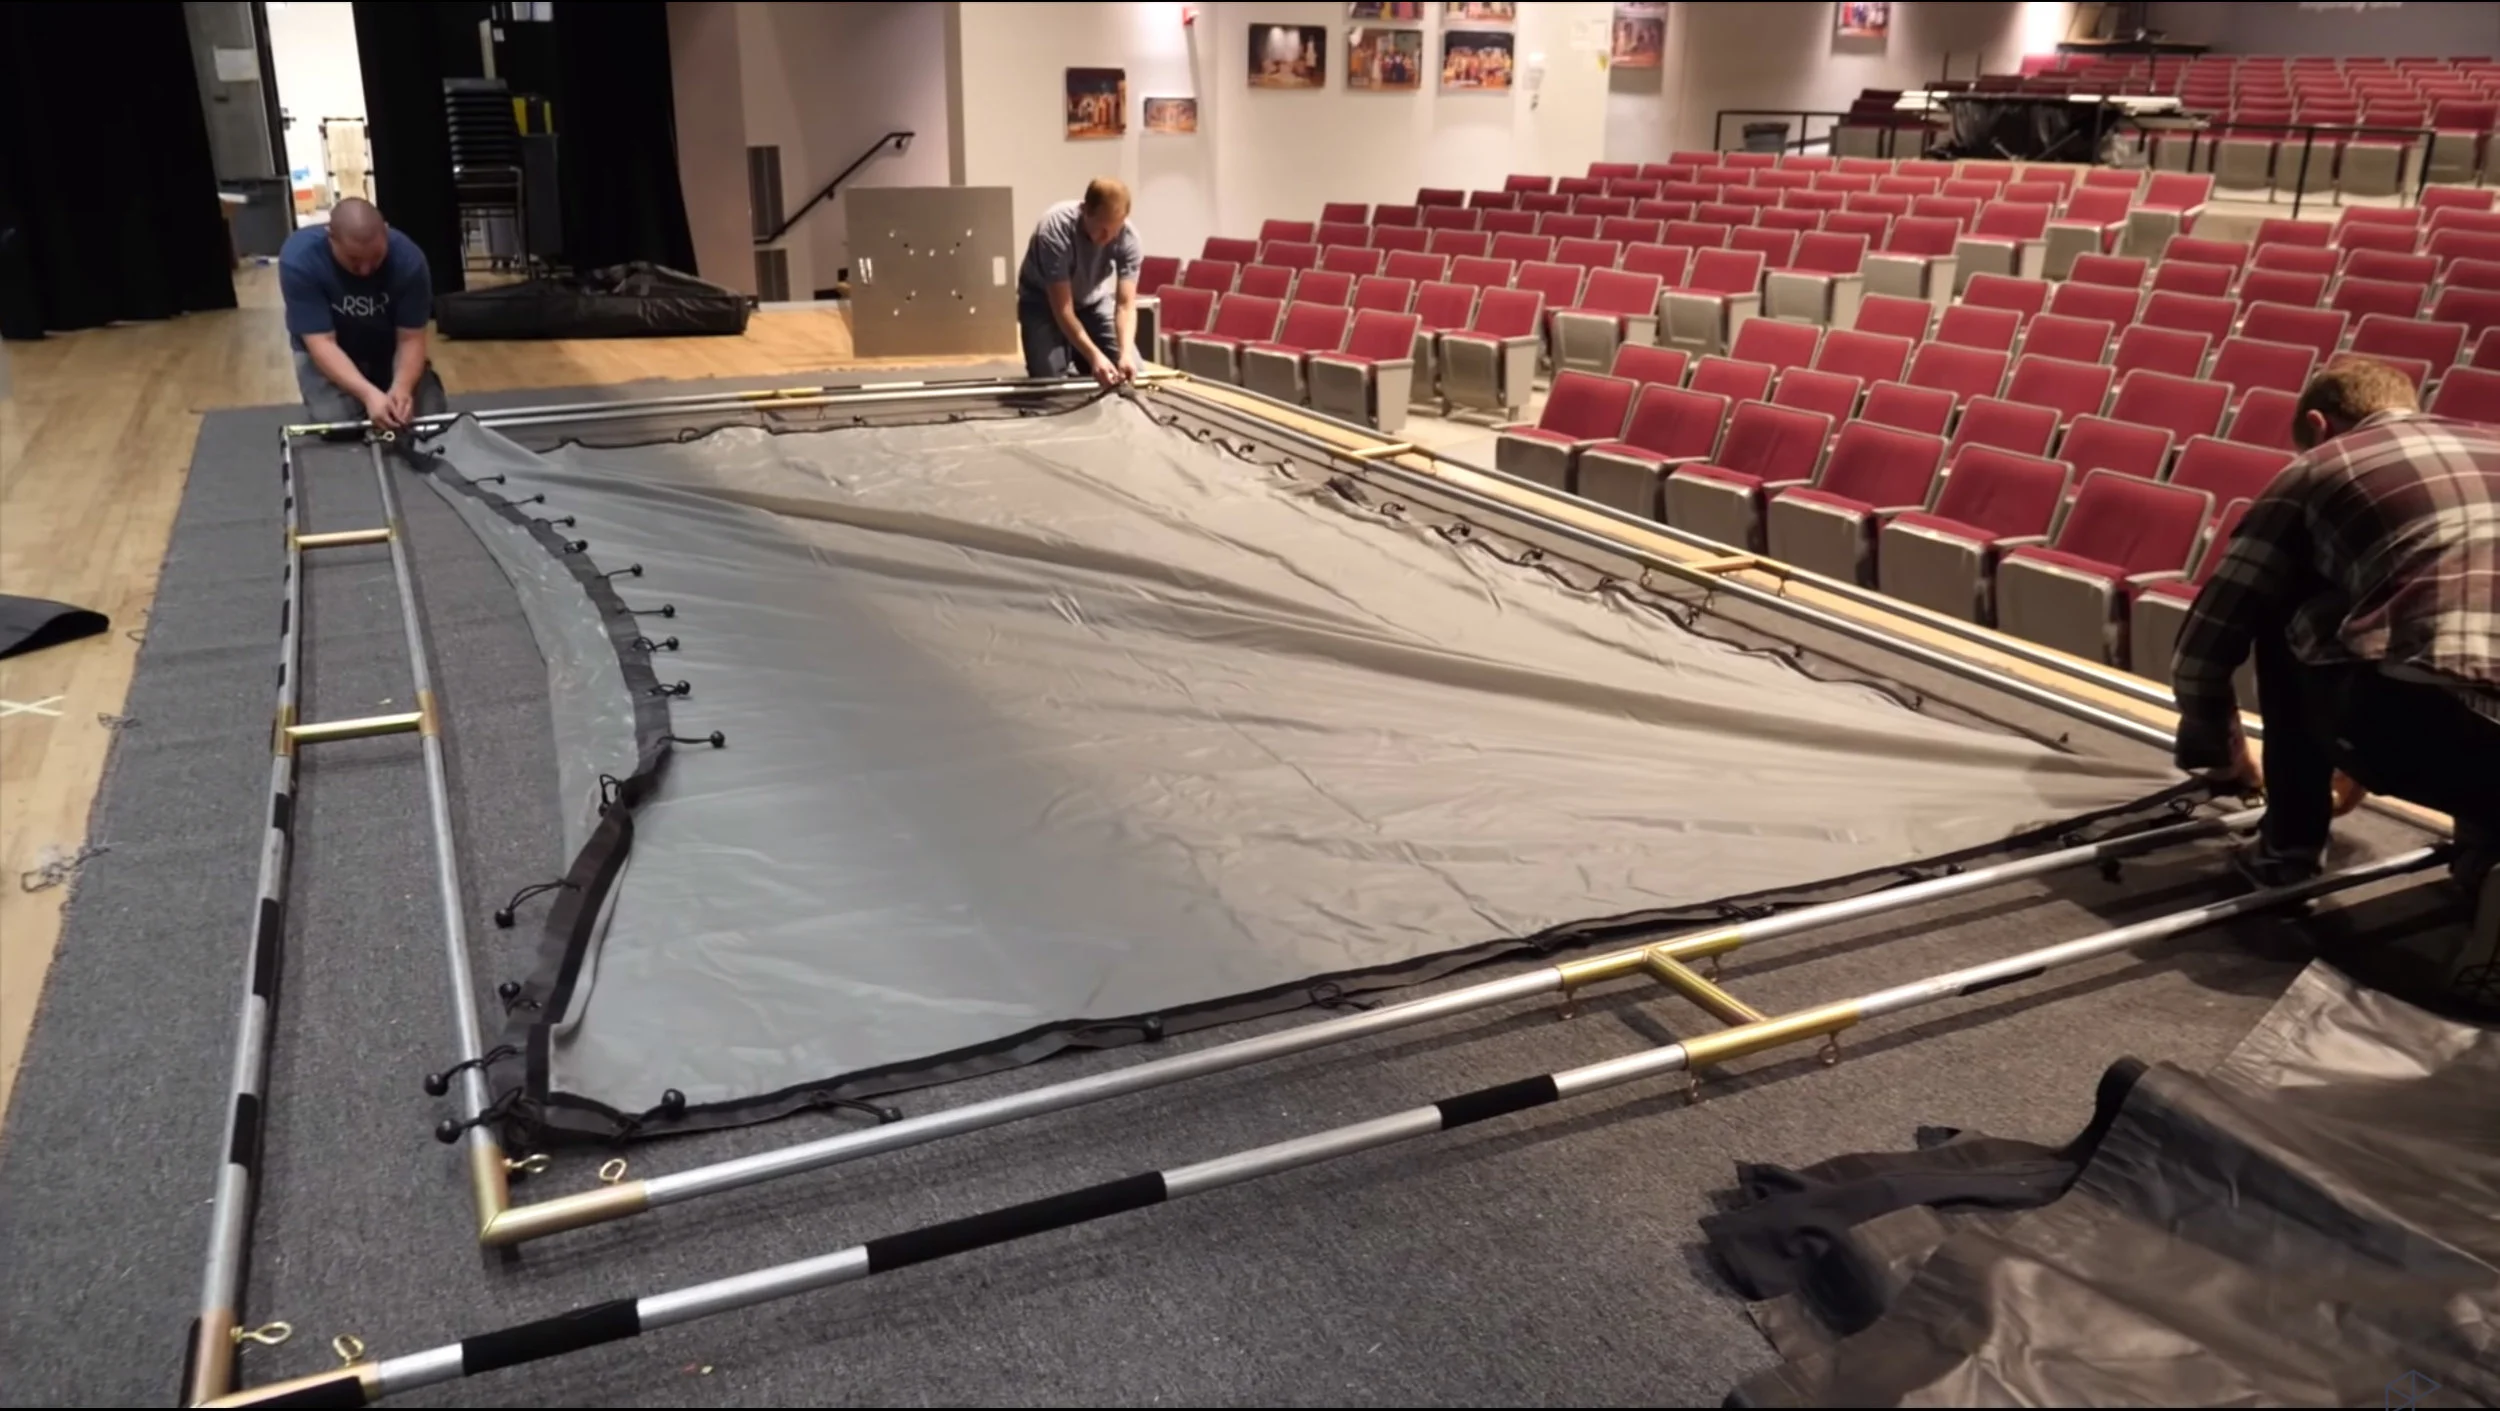
The next step is to unfold the projection screen.
We stretched it out to all the corners. Then we start using the little black bungees to secure the screen to the frame
Pro-tip: It's the gray screen, which I think is a little bit better for situations where you might be dealing with some extra light going on in the room.
Step 3: Add the black skirting
Finally, we custom-made some black skirting to go over the frame. We had some black fabric, put some Velcro on it, cut it to the right size and that just goes around the frame. It helps it just look sleeker, so people don't actually see that one inch tubing.

Attaching the screen to the trusses
Step 1: Secure with swivel clamps
Once the screen is secured to the frame and the skirts are on the frame, it's ready to mount to those two upstage trusses.
We get a few guys on each side of the frame to lift it up. We also have a couple guys climb to the top of the trusses so they can then clamp the screen to the trussing there.
You'll see on our trusses we just use some swivel clamps. Those four swivel clamps are what's mounting the frame of the screen onto the trusses.

Step 2: Start the projector
Once the screen is up, it's time to get the projector up and running.

The projector we use is a ViewSonic LS830 4500 Lumen, Full HD, Ultra-Short Throw Laser DLP Projector. It was $3,000 so it's not cheap, but we needed it to cast a really large image and have really short throw.
Step 3: Connect with a HDM cable
We then use a 100 foot HDMI cable to send the signal from our laptop running ProPresenter in the tech booth to the projector behind the screen. It's really important if you're running an HDMI signal that long that you have a cable with a built in signal booster.

Speaking of ProPresenter, that’s the software of choice we use for presentation software in worship. So we’re able to display lyrics and videos and sermon slides and any other thing that we want to display visually in worship. We’re also able to automate all of our ProPresenter slides during songs. So that makes it so we never have late or missed lyric cues. I use Ableton Live to accomplish that.
Where to find the gear we used
So that’s our screen setup for every Sunday! It’s a system and system we’ve developed after many iterations and hours (and maybe a few tears).
To find an organized list of the gear and software I use to lead worship, download my Worship Ministry Toolkit. It’s a helpful spreadsheet containing all of my preferences and recommendations.
To find more of my experiences and learnings, check out WorshipLeaderSchool.com–a membership site packed with in-depth, practical training on all aspects of planning, building, running and growing a successful worship ministry.
As part of Worship Leader School, you’ll get a ton of exclusive and helpful content like
Access to a library of material that covers the best practices and “how-to’s” for the pastoral, musical and technical aspects of leading worship.
A community of pastors from around the globe who share their experiences and knowledge.
Each week, you can chat with me or a member of Worship Leader School during Office Hours to strategize and receive real time support for your worship ministry.
I’d love to hop on a call and chat about how I can help you grow as a worship leader
Just schedule a free strategy session and we’ll connect!
Looking forward to meeting you!