worship gear

How to make a small worship band sound big

How to make a small worship band sound big

On most Sundays, my worship band consists of only four members. I sing and play acoustic. My assistant worship leader is on vocals, and we have a keyboardist and drummer. No bassist. No electric guitars. No background vocals. Even with a small ensemble, we manage to achieve a big sound in worship. In this article, I’ll tell you all about how we do it and watch to the end because I tell you about my #1 software recommendation for achieving a full sound in worship.

The most affordable in-ear monitor system for worship bands

The most affordable in-ear monitor system for worship bands

Before you spend thousands of dollars on wireless monitors or digital personal mixers, check out this ultra-cheap but reliable solution for worship band in-ear monitors.

How to setup worship and production gear at a church plant

I’m a worship leader at a church plant. Every Sunday I wake up at 5 AM, shower, get dressed, head to my office where I pick up my gear, grab McDonald's breakfast, and make the 20-minute drive to Green Mountain High School where Mission Lakewood gathers for Sunday Worship. There’s a lot of work that happens between 7 AM and 9:30 AM to set up our worship space. I’ll walk you through it all in this article.

One of the best parts of planting a church is you get to start from scratch. In all aspects of ministry, you have the opportunity to build everything from the ground up. No existing traditions, systems, equipment, and the headaches that come along with them. I’m an entrepreneur. The challenge of starting things from scratch energizes me. That is why I was pumped to join Mission Lakewood as the worship pastor.

One of the worst parts of planting a church is you start from scratch. You have no building or existing equipment to use for worship. All of it has to be set up and torn down.

Every...single...week.

My friend Kevin was in charge of selecting and purchasing the production gear for our church plant. When he sent along the gear list for Mission Lakewood, I could not wait to get my hands on it and start using it every Sunday. I geek out over this stuff, and I’m super fussy about using gear that is high quality (but not overpriced) and creating efficient systems for setup and teardown.

We are a month into our church plant, and I couldn’t be happier with where we are at with our set up process. Last Sunday, setup took only an hour and a half, which allows our worship band a full hour to run through and tidy up our five song set list. The first few weeks were not easy. One Sunday we had so many production issues to troubleshoot that we only had about 15 minutes to rehearse our music. Barely enough time to run the whole set.

I thought it would be fun to walk you through exactly what a Sunday morning looks like at Mission Lakewood before the worship service begins. Our production gear would work great for anyone considering a church plant or leading worship at a church plant. To access a document containing links and pricing to all of the gear I’m about to cover, download the worship toolkit.

I will break the remainder of this article into the various steps of set up for worship and production at our church plant.

Step 1 - Scope out the auditorium and make sure there are no obstructions.

We meet at a high school. We do not always know what the auditorium will look like upon arrival because the theater department also uses the space for their musicals and plays. So far, they have done a fantastic job at keeping the central part of the stage clear. They have background set piece for the musical, The Adam’s Family, but once our trusses and screen are up, you cannot tell it’s there.

When I arrive at the school, I scope out the sides of the stage to ensure there aren’t other random set pieces in the way of where we need to move in our flight cases containing gear. It is a small detail, but half the battle of setup is making sure you don’t make the process harder for yourself. We want to have our cases in the same spot with space around them every week, so we have easy and quick access to it.

Step 2 - Roll out the carpet

Our stage has a shiny wood floor. I have no clue what they thought when they designed it that way. Reflective, light-colored floors are horrible for stages. When in doubt, pain your stage floor matte black. Since we cannot paint the floor, we purchased a large but inexpensive, dark-colored carpet. It drastically helps reduce the amount of light pollution on stage and makes it look sharp.

Step 3 - Assemble the wide-screen

The prominent feature of our stage design is the widescreen. We chose to go with a widescreen for many reasons. We wanted an efficient way to project lyrics on one screen. That meant it needed to be in the center and behind the band. We also wanted a quick way to cover up the background of the stage. This wide-screen is 18 ft wide by approximately 12 ft tall. No matter what the school theater department sets up behind us, you cannot see it.

From a stage design perspective, I highly prefer a widescreen over anything else. It’s the easiest way to transform the aesthetic and look of your stage. It’s minimalistic but allows you to cast whatever image, video, and background textures you want.

We purchased our screen from Carl’s Place (www.carlofet.com). Carl’s place creates DIY projection screens that give you a massive display on a small budget. Here’s how it works. When you order a DIY kit from Carl’s Place, you receive the screen material with grommets, bungee cords to mount the screen to the frame, steel corner/support fittings, and assembly instructions to go to a local hardware store and purchase 1” piping to complete the frame yourself. It saves a lot of money on shipping and a lot of money compared to purchasing the whole frame yourself. Setting up our screen takes about 10 minutes with 3 or 4 people helping assemble the frame and connecting the bungee cords.

Step 4 - Assemble the trusses and mount lights on the trusses.

While the screen is assembled, other volunteers work on building the four 11ft trusses. On the top of all four trusses, we mount two LED wash lights. The center trusses hold up the widescreen. The trusses remain on the floor while we mount the lights. When the screen and trusses are ready, we raise and secure the screen on the trusses.

Step 5 - Set up the audio equipment and band instruments.

Once the screen and trusses are up, our band members and one of the production volunteers begins assembling the sound system and instruments. Our sound system consists of the following equipment.

  • Midas M32R - This is a fantastic sound console. It has the simple user interface of a Behringer X32 but with higher quality hardware and preamps. The M32 has wifi connectivity so it can be controlled by a tablet for total control or smartphones to control monitors.
  • Behringer S32 - We use this as a digital stage snake that is rack mounted and positioned by the drum set. Everything is plugged into the S32 and networked back to the M32R over an ethercon cable.
  • Powered Speakers - Our EV powered speakers pack a punch and sound fantastic. We have two 12 inch tops and two 18” subwoofers.
  • Wireless Microphones - We use three Sennheiser wireless microphones. One for the worship leader. One for the preaching pastor. One for the hosting pastor.
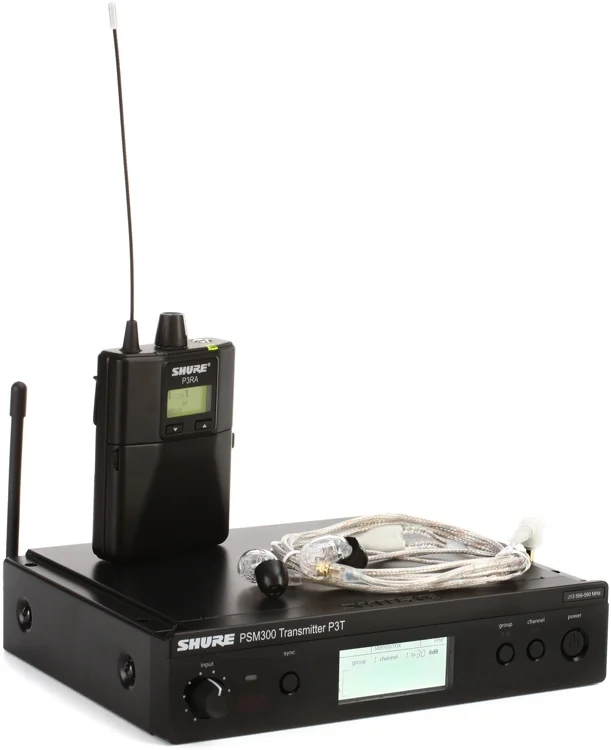
  • Wireless In-Ear Monitors - We have one wireless in-ear monitor transmitter paired with two wireless receivers. Each receiver receives a mono signal and is panned either to the left or right. It’s a handy hack to prevent the need to buy a second transmitter.
  • Other - We also have an Audix drum mic kit, a bunch of microphone stands, cables, DI Boxes, and a few Behringer P16 monitors. I’m not a huge fan of the P16. I’m going to purchase an eight channel headphone amp that will be a much more straightforward setup (not having to deal with the mixers), and the musicians can control their mix wirelessly with their phones (using the M32 app).

Our church owns a Gretch Catalina Club drum set with DW hardware and Zildjian K-Custom cymbals. Our keyboard rig consists of an M-Audio midi controller and MacBook Air running Mainstage.

Step 6 - Set up lighting.

We use the American DJ MyDMX 3.0 lighting controller to run our LED lights and the school’s existing DMX system. From our media laptop (which runs MyDMX 3.0 and ProPresenter), we plug a USB cable into the MyDMX interface and out from the interface, the DMX cable goes into a splitter. We run a DMX back to the school’s media booth where we plug into their DMX system, and we run a DMX line to the stage for our LED lighting system.

Once the trusses and screen are up, a production volunteer connects the four truss warmer lights and top wash lights with DMX and power-con cables. Everything is daisy-chained which drastically reduces cabling.

Step 7 - Set up the widescreen projector and stage display projector.

Approximately 5ft behind the widescreen, we place our ultra-short throw projector for a rear-projected image. We have another rear-projection setup in the back of the auditorium for stage display lyrics.

Step 8 - Troubleshoot and fine tune

Every week we spend a few minutes troubleshooting or fine-tuning the setup. One crucial fine-tuning step is light placement. Our LED lights have to be positioned in the right place, so they do not blind the congregation and they do not wash out the widescreen.

By 8:30, the band starts rehearsal, so that is when the production team will troubleshoot or fine-tune any issues with the setup. I use Ableton Live to automate ProPresenter and lighting, so this frees up our production volunteers to focus on mixing sound and making sure everything is functioning correctly.

On a good day, the band is finished rehearsal at 9:30 AM and we have our production meeting where we talk through the order of service with the pastors, ensuring everyone is on the same page. Then we have about 20 minutes to chill before the service and greet people as they enter. Our five-minute countdown video begins at 9:57 AM and the service kicks off at 10:02 AM.

That’s how we set up our church plant.

At least that’s how we set up worship and production for our church plant. This articled covered nothing about setting up for kids ministry and first impressions, each of which deserves a lengthy description.

I mentioned a lot of gear in this post. You can access my detailed and comprehensive list of gear by downloading my Worship Toolkit. It contains pricing and links to everything we use at Mission Lakewood.

What questions do you have about our set up? Let me know in the comments! Or better, leave me a voice message question and it could be featured on my podcast!


The gear and software you will need to Lead Worship with Ableton

Before using Ableton Live to run a click, tracks, and lighting and lyrics automation in worship, you’re going to need some gear in place to utilize the power of this amazing software. The following is a list of hardware and software you will need. I will cover the following.

  1. Sound system requirements

  2. Recommended computer for running Ableton

  3. Media storage

  4. Which version of Ableton Live you should buy

  5. Gear and software for lyric automation ProPresenter

  6. Gear and software for lighting automation with myDMX 3.0

This may seem like a lot! If you are new to leading worship with Ableton, focus on acquiring the gear and software in steps 1-4. If you are willing to commit the time to learning Ableton for worship and you enroll in my upcoming training, you will learn everything you need to know in only a few hours and you'll become an Ableton ninja!

1. Sound System Requirements

Sound console. Have a sound console (digital or analog) with at least two available input channels for your click track and backing tracks.

In-ear monitoring. Your band members need to be able to hear the click track. You do not want to send the click track through floor wedges. At the very least, I recommend having in-ear monitoring for the drummer and worship leader. If your band does not have in-ear monitoring, do not despair. Check out this article on how to get them set up at your church even on a low budget.

How to connect your laptop (which runs Ableton) to your sound system. You’ll need a 3.5 mm TRS to Dual 1/4 inch TS Stereo Breakout Cable. The 3.5mm end goes into the headphone jack of your laptop. The dual ¼ inch end of the cable will plug into a stereo DI box (or two mono DI boxes). From the DI box, you’ll run XLR cables to your stage snake or sound console (like you would any other microphone or instrument)

2. Computer Recommendation

Use a fairly new MacBook Air or MacBook Pro. You can run Ableton Live on PC, but I recommend Mac because Ableton runs 10x better on Mac (like every other creative software) and you will be able to maximize my training. You do not need the biggest, high-performing, overpriced MacBook Pro. Make sure it’s not more than a few years old, and it meets the tech specs Ableton has on their website.

3. Multitrack and Ableton Project File Storage

You'll learn quickly that using Ableton Live to run your multitracks requires a fairly large amount of file storage and management. I highly recommend buying an external hard drive that has the sole purpose of storing your Ableton Live sessions and multitrack stems. Solid state hard drives are becoming more affordable, so buy one of those if you can. If not, a regular external hard drive (at least 500GB) will suffice.

4. Selecting the right version of Ableton Live

The exciting part is you do not need to purchase Ableton Live to begin using it. At ableton.com you can download a 30-day free trial of the Ableton Live Suite. They give you 100% functionality of the software. Personally, I recommend Ableton Live Standard because it gives you unlimited tracks. But you can still make the most out of Ableton Live for worship with the Intro version. You will just need to consolidate your tracks to 16 or less.

Those are all the gear and software requirements to get going with Ableton Live to run a click and tracks. I would master this setup before advancing to production automation described below.

Here are additional things you will need to automate lyrics in ProPresenter and lighting with MyDMX3.0. Can you automate other presentation and lighting software with Ableton Live? Yes but I have not researched or learned how to do it. This level of Ableton Live programming is pretty advanced, and I have only spent time learning how to do it with ProPresenter and MyDMX 3.0. I highly recommend these two pieces of software for any small to mid-sized church. Together they will run just under $900, but the automation capability you will have for lyrics and lighting is incredible.

5. Gear and software to automate lyrics and video

A newer Mac to run ProPresenter - ProPresenter is significantly more stable on Mac and in my training I can walk you through how to control ProPresenter from Ableton Live using a Mac-only ecosystem.

ProPresenter - As I mentioned, this is the #1 presentation software for worship. It’s not perfect, but it is super powerful and can receive MIDI commands, which is how you automate it with Ableton Live. If you do not have ProPresenter, you can download it in trial mode and try out all the features. There will be a watermark on the output screen until you purchase it.

ProPresenter MIDI module - This is an add-on to ProPresenter that allows it to accept MIDI cues. You can fully demo this add-on before purchasing. You’ll have the ProPresenter watermark on your screen until you do purchase it.

Wifi Router - You can use an existing wifi network or create a new one by purchasing an inexpensive router. You need wifi so you can network your Ableton computer to your ProPresenter and Lighting computers.

6. Gear and software to automate lighting

A newer Mac to run Lighting software - You could run your lighting software on the same computer as ProPresenter, just make sure it is a newer and powerful Mac to ensure stability. At my church, we have a 2016 15” MacBook Pro running ProPresenter and MyDMX 3.0.

MyDMX 3.0 Controller and Software - This is hands down my favorite way to run lights in a church setting. The controller is a small USB to DMX interface. The lite version of the software comes free with the controller.

MyDMX 3.0 Software Upgrade - To utilize the MIDI functionality on MyDMX 3.0 you must purchase the FULL version of the software.

Wifi Router - You can use an existing wifi network or create a new one by purchasing an inexpensive router. You need wifi so you can network your Ableton computer to your ProPresenter and Lighting computers.

That is all of the gear I use to run Ableton Live for worship. That may seem like a lot at first, and it can be a bit overwhelming if you are new to this setup. I would encourage you to start first with the click and tracks set up. Once you feel like you’ve mastered that, then up your game with production automation.

Do you want to know exactly how much this will cost? You’ll want to download my Lead Worship with Ableton Toolkit for just that. It’s a detailed spreadsheet that will give you estimated totals for all of this software and gear. It also includes links to the best place to purchase them. It will save you a ton of time making sure you have everything you need to get going with Ableton Live.

Click the button below, complete the form, and I’ll send you instant access to the Lead Worship with Ableton Toolkit.

The Ultimate Gear List for Portable Churches on a Budget

The Ultimate Gear List for Portable Churches on a Budget

In this article, I am going to share with you the secret sauce of portable equipment that won’t destroy your church’s budget, and in fact, will make your setup and tear-down process a breeze and it will cost a lot less than what you are expecting.

In-Ear Monitor Solutions for Worship Bands

Advantages of in-ear monitoring for worship bands

In-ear monitoring for bands has been around for a few decades now. This type of monitoring has several advantages. Musicians can hear themselves much better, making it easier to sing or play one’s instrument with excellence. Stage noise is drastically reduced, making it much easier for the sound guy to produce a clean mix. In-ears allow bands to play with a click track without the audience hearing an annoying metronome sound. Of all of the advantages of using in-ear monitoring, using a click track is by far the greatest advantage offered by this technology. When the band plays in perfect time together with a click track, they can begin to utilize backing tracks that bring the musical experience to a whole new level. Almost all new worship songs produced today rely heavily on backing tracks. Just listen to the latest albums by Hillsong United, Elevation Worship, and Red Rocks Worship. Backing tracks allow worship bands at small to mid-sized church utilize these same sounds. You can download these tracks at multitracks.com or loopcommunity.com. Using software like Ableton Live to run your click and backing tracks also gives worship bands the capability to automate their lighting and video systems.

I share all of these advantages to using in-ear monitors to give you a glimpse of the possibilities they provide for improving your worship ministry. You do not need to be a professional musician or have a multi-million dollar church budget to get started with in-ear monitoring. In my opinion, in-ear monitoring can help the struggling worship band on a tight budget make drastic improvements to their sound without breaking the bank. Here are three options for building a wireless in-ear monitor system for your church. This guide assumes you already have the basics of a sound system such as loudspeakers for your congregation and at least a 16-channel mixer. In this example, I am going to use the Behringer X32 to demonstrate in-ear monitor setup. This board has dominated the market of affordable digital boards the past few years and is a popular choice for smaller churches on a budget.


Option #1 - Headphone Amp
Low Budget (<$500)

The Gear

  1. Headphone Amp 

  2. Headphone Extension Cables

  3. Cheap in ear headphones  

The Setup

It is the most affordable in-ear monitor setup. It’s important to note that it is NOT wireless. The downside is your musicians can only move around on stage as far as the headphone extension cable will allow them. The upside is you never need to worry about batteries and wireless packs. Here is how this setup works.

Route your monitor mixes from the mix bus or auxiliary outputs on your mixer to the stage. This will look different depending on how you route signals to the stage from your soundboard. For some people, this may be the most tricky part of this setup. In some cases, you made need a separate snake or adaptors to convert your cables to the proper type. For example, I would need to convert the XLR outputs of the X32 to a quarter inch connection so I can connect my mix bus outputs to the headphone amp I will show you in a few minutes. It would cost me about $100 for an eight channel ¼” snake and the adaptors to plug into the Mixbus outputs on the X32. Or I could put my monitor mixes from the ¼” auxiliary outputs on the back of the X32.

Once those signals are on the stage, find a location for a headphone amp. I recommend a headphone amp like the Behringer HA8000. It is only $150 and has eight channels, which will allow up to 8 separate monitor mixes from your front of house board.

To get the signal from your musicians to their in-ear headphones, you will need some long headphone extension cables. Twenty-five-foot extension cables should work for most stages. If your band was using the X32 or a similar digital board, each musician could control their monitor mix with the X32 app.

That completes this first setup for in-ear monitoring for your worship band. It is by far the least expensive, but it does require a bit more cabling work. It also requires that your mixer has as many outputs for monitors as you would need for individual mixes. If you only have 2 or 4 auxiliary sends, the same setup would work, but your musicians would not be able to have individual mixes.


Option #2 - Digital Personal Mixer
Mid-range Budget ($1500-$3000)

The Gear

  1. Digital Personal Mixers
  2. Ethernet Cables
  3. Mid Range Headphones

The Setup

Thanks to the drop in the price of digital mixing technology, Digital Personal Mixers have become an attractive solution for worship band in-ear monitors. Here’s how the concept works. From the digital board like the X32, you can send a digital signal containing 16 channels of your band over a single networking cable to Digital Personal Mixers on stage. These personal mixers can be daisy chained with the network cable and every musician with his or own mixer can create a unique mix. These personal mixers are easy for anyone to use.

While the setup of this monitoring system is simple and it allows for unlimited personal mixes, it does have a few downsides. First, the cost may be prohibitive for many churches. These digital mixers cost $300 each, totaling up to $1500-$2000 for your average five to seven person worship band. Another downside is the fact your musicians are tethered to these personal mixers with a headphone cable, unless if you spend the extra money for some wireless in-ear transmitters, you can connect to these personal mixers. For most band members, being tethered is not a problem. But it can be a pain for worship leaders and vocalists. The other downside is you have additional gear on stage. I cannot stand the look of digital personal mixers on stage, especially if they are not hidden.

While digital personal mixers have a few advantages, this is probably my least favorite setup. If you were to purchase these, I would recommend using them for your drummer and keyboardist. Those musicians do not move around the stage, and it is easy to hide the personal mixer somewhere behind their instrument. If I had to choose between Digital Personal Mixers and the budget solution of a Headphone Amplifier, I would definitely choose the headphone amp. I would much rather control my monitor mix wirelessly with my phone than with a digital personal mixer.


Option #3 - Wireless In-Ear Monitor Systems
High Budget - ($4000-$5000)

The Gear

  1. Transmitters

  2. Receivers

  3. High end headphones

The Setup

This setup is my favorite form of in-ear monitoring. Unfortunately, it also costs the most. Here is how it works.

If you are using a soundboard like the X32, setting up wireless in-ear monitors is simple. First, find a wireless in-ear monitor system you will use. You can expect to pay anywhere between five to six hundred dollars per individual monitor mix. One way to save money is to put two separate mixes on a stereo wireless system. You would buy two wireless receivers for every transmitter. The transmitter can take two channels of audio from your mixer. Usually, this is to give your musician a stereo mix. That is unnecessary for worship band musicians. What you can do is send the left channel to one receiver and the right channel to the other receiver. Make sure those receivers are in mono mode and panned to either left or right depending on which mix that musician needs to hear. You’ll save hundreds, if not thousands of dollars by doing this.

Your band members can control their mixes by using your sound board’s monitor app on their mobile device. They are also free to move about the stage without being tethered to a headphone extension cable or digital personal mixers. There are a couple of downsides to using wireless monitors. First, you must worry about having fresh batteries. I recommend finding some reliable rechargeable batteries and replacing them every other year. The second downside is wireless interference and signal drops. If your system is not setup properly or it is cheap, there is a good chance you will experience wireless issues. If you are going the wireless monitor route, spend the money for proper gear and a professional install.


I hope this gives you some clear direction and ideas for building an in-ear monitor system for your worship band. This setup will look different for all churches. I think you’ll see that any band can have in-ear monitoring even on a small budget.  If you have any questions, let me know in the comments.