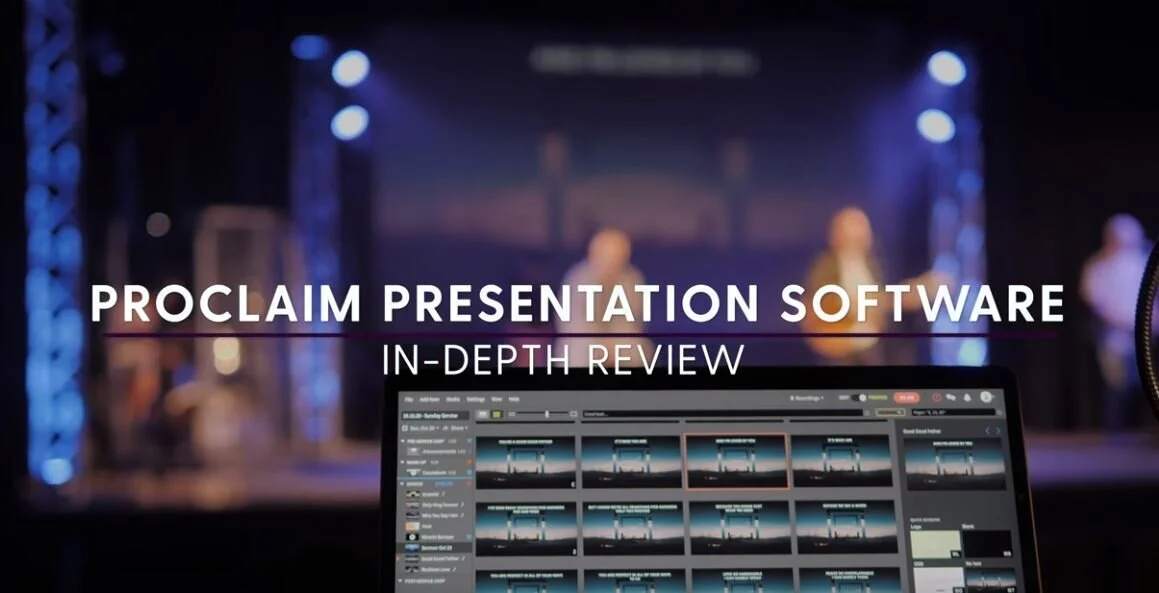
We dive into how we use Proclaim Presentation software in our worship ministry by showing its pros/cons, how we automate it, and how it integrates with our setup.

In this article, we’ll be going back to our first Worship Tech Tour at Lighthouse Church.
We’ll be covering:
Overcoming difficult room and sound issues
Sound system setup
Screen, display, and lighting
Video capture
Extra Tech

Like a lot of churches, Lighthouse isn’t setup in a room that was designed with modern worship in mind. It’s an old building with high ceilings, making it tough to EQ and also very echo-y. Andrew Lepard, director of Digital Media, has come up with a budget-friendly way to cut down on the echoes and create an environment that is ideal for their worship ministry.

Sound Proofing
Lighthouse was able to pick up very cheap, 2x4 sound proofing material from Home Depot and put it all along the walls to cut down on echoes. After putting up some black felt material over it, they’ve already eliminated a good chunk of the ambient noise.

Chairs
The second part of their sound solution is simply to fill the room with their normal chairs. Their felt-covered chairs break up additional sound, giving them cheap solution they need to have a room that they can EQ.
Speakers
Lighthouse has got a fairly long room, so their speaker system is geared to filling out the area as best they can.
Front Fill
Lighthouse uses a pair of IQ12 speakers, raised up at the front, combined with four Milan M10’s under the stage to fill out the front of house. Along with those speakers are four Turbosound IQ18 subwoofers to cover the bass-end.
Rear and Side Fill
Because the room is long, Andrew and his team use two more Milan M10’s, raised up on each side, to fill out the rest of the room. This way, the sound team ensures that all congregation members can hear properly, no matter their position in the room.

Sound Board System and Stage Boxes
Lighthouse is running the tried-and-true Behringer X32 sound board. One of our favorites here at Churchfront, the flexibility of the X32 is to it’s fullest potential. The board is hooked up to two X32 stage racks, giving the team 32, independent channels just for in-ear monitoring. The racks then send signal back to the board via an ethernet cable where Andrew has full control of compression, EQ, gain and other effects.

In-Ear Monitors
For their In-Ear’s, the band is setup with the Shure PSM wireless system. While this setup could experience some line-of-sight issues, Lighthouse has found that the system provides them with the reliability and flexibility they need for their team. Because they have so many channels just for in-ears, the worship band could potentially be quite large, all while still being able to give band members stereo audio if needed.

Mic System
The mic setup at this church is pretty streamlined as they primarily use wireless, Shure Beta87A’s. The only exception is a wired version of the Beta87A, which they use as their main mic in case their wireless system goes down. This setup keeps things simple and reliable during service.

Lighthouse also uses a few Audio-Technica 5-inch shotgun mics for the congregation. The band members like to EQ in some of the congregation in their in-ear monitors so they can have a better ‘room-feel’ during service. They can also use these mics to bring in the voices of the church members when they do live-recordings of their services.
Monitoring
Going back to the long-room issue from earlier, Andrew has come up with a unique solution for their sound team during services. Rather than blasting the speakers and deafening the congregants in order to hear and mix the sound, the team have setup a monitoring system for their tech team at the back. They’ve got a couple KRK Rokit 5’s and a EuroLive subwoofer that give the team an accurate sound picture of the mix.

Mixing
To further improve their mixing abilities, Andrew went around the entire room at Lighthouse and recorded audio in order to tune for good frequencies. This enabled Lighthouse to setup a 31-band graphic EQ, giving them extensive control over mixing for their services.
Effects
Lastly, the team has setup a few basic effects to improve the overall sound of the band. They use both a short and long reverb, as well as a tap-delay on the vocals in order to fill out the sound of the band.
During service, Lighthouse uses Ableton to help control and automate their tracks. They have Ableton hooked up to a PC which they place next to their drummer.
In the sound board, they have eight dedicated channels, two of which are for guide and click tracks. The other 6 track channels are setup as DCA’s so they can change the sound as needed. Recording their tracks is quite simple since the X32 has an SD card slot in the back, enabling them to record all 32 channels simultaneously.

For recording the pastor’s sermons, they have a flash drive hooked up to the front of the board as well as a back-up mic that’s built into the camera they use to record the service.
Main Screen and Projector
One of the first things you notice when you walk into Lighthouse church is their massive screen. They’ve got a 2:35 custom screen from Carl’s Place (the same company that made our screen at Mission Lakewood) that fills almost the entire front-of-house.

They us an Epson short-throw, laser projector to project on the screen. This is a great compliment to the screen as it sits behind the display and projects a crystal-clear image onto the screen. Even though it has only eight feet of throw, this projector is extremely high quality and is the perfect piece of tech for Lighthouse.

Confidence Monitor
While it may not be as impressive as the screen and display, the confidence monitor gets the job done in a simple, functional way.
The team has setup a 40-inch TV monitor that they’ve propped up on the front row pews so the entire band can see. Simple, easy, and no-fuss.
Display Software
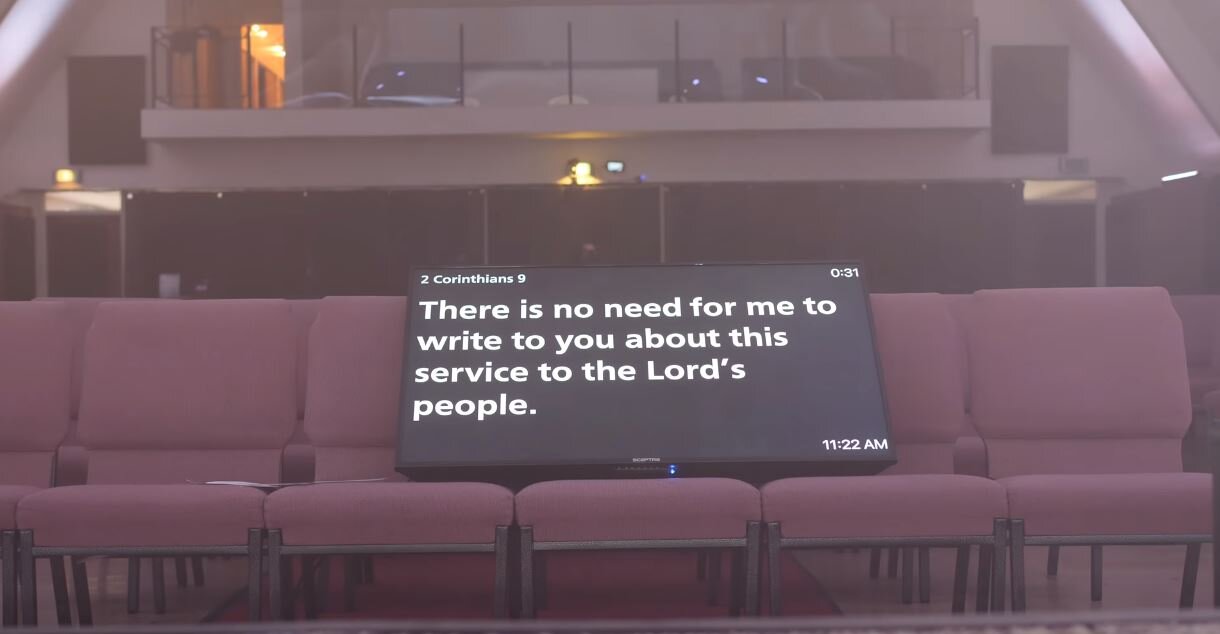
What originally started out as the budget option actually turned out to be very beneficial for the Lighthouse team. The tech team use Proclaim as their display software, and after forming a relationship with the Proclaim team, they’ve been able to work together and found that the software is the right fit for them. The slides and flow are typically done manually every week, which keeps things simple for the team, who don’t use a great deal of automation.

Lights
While they may not use much Ableton automation, they do use Proclaim’s automation to its fullest with their lights. Using LightKey, the team can fully automate and control their lights and light scenes at just the click of a button.

Lighthouse uses a myriad of different lights to determine the mood during service, including several light bars and amber lights during the sermon. To cap things off, they use the Hurricane Haze 4D hazer machine to create additional ambience for special services like worship nights.

The last element of Lighthouse’s tech setup is their camera system. While they do not use their cameras for live streaming, their system is quite robust and is perfect for recording services and sending visual/audio to the cry room and the green room for the band.
Cameras
Lighthouse uses a three-camera setup to record their services.
They use the Sony NXCAM in the back of the room for wide shots,
A camera mounted near the drummer for band shots,
Sony A7 mounted higher with an ATM OS external recorder for capturing the visual and audio.
This last combination of camera and audio recording enables them to be flexible with recording and editing if they need to produce any videos later on.
Additionally, the A7 is recording externally, which means they send the feed to an ethernet splitter. This sends the audio and visual to the cry room and the green room so that all church members can view and listen to the sermon.

The last part of the Lighthouse setup is the computer itself. They’re running a super powerful iMac Pro to help them manage all of their software.
The iMac is running Proclaim and LightKey, as well as a Chrome window with Google Voice. This allows the children’s ministry volunteers to text the tech team a child’s code and the team can put it up on the screen via Proclaim for the parents.
While you don’t need a monster computer like the iMac Pro to run most of these tasks, Lighthouse invested in it so that they can have the processing power needed for heavy video editing that they may want to do in the future.
Lastly is the Scarlett 2i2 Audio Interface that connects from the computer to the X32 sound board. The tech team was running into some sound issues and popping so it’s just a way to ensure clean audio throughout their whole setup.

Concluding Thoughts
Overall, we hope you enjoyed this Worship Tech Tour. It’s awesome to see how individual churches find solutions to overcome their own unique tech issues. Thanks again to Andrew for taking us through the setup at Lighthouse!
My team and I at Churchfront specialize in helping churches of all sizes find solutions tailored to their needs.
Click here to hop on a call, connect with us and see if working with us is a good fit for you.
This is a three-part series where I’ll show you the tools you need for seamless audio, video, lighting and automation during your church service without needing a huge budget or team.
In part one, I’m covering audio and going over:
Digital mixing consoles
Digital stage boxes
In-ear monitors
Digital audio networking
After reading this guide to worship tech and the other two below, you'll have a strong foundation for your growing worship ministry.

First off, I want to stress the importance of having a robust and functioning audio system which is critical to the entire service. Any interruptions or errors during service can distract the congregation or even hinder them from participating. If you only look into one of the tools we recommend today, check out the audio system–it’ll go a long way in improving your service and allowing your congregation to worship fully.
Our first recommendation is the digital mixing console. It’s the heart of your church’s sound system, allowing you to process, route, mix and record audio. Old analog mixers can still get the job done, but you’re missing out on so many features that could enhance the sound of your worship.
Most digital mixers come with EEQ, reverb, and delays all built into the internal computer so you don’t have a bunch of separate pieces of equipment laying around. Having all of those abilities at your finger-tips makes it easy to create high-quality mixes.

Another great thing about going digital is that most of them can record to USB drive or SD card, so you can plug in your computer with a digital audio workstation (DAW) and produce an entire worship album. For all of the built-in capability and ease-of-use, you’d expect these pieces of tech to go for over $10,000. While you used to pay that much, you can get some great quality digital mixers for less than $2,000!
Some of our favorite consoles here at Churchfront include the:
Midas M32
Allen & Heath SQ
While each of these options have their pros and cons, you really can't go wrong with any of them. Implementing a digital mixing console will help you lay a great foundation for you to build on.
Our next recommendation is the digital stage box. It’s the next step in building your audio tech once you have a digital mixing console.
These stage boxes typically have 8-32 input channels, and 8-16 outputs; your musicians plug in their mics or instruments and can set up their own in-ear monitoring all on their own. Everything gets routed back to the mixing console via an ethernet cable, so you don’t have to use bulky, unreliable analog snakes anymore. Put 2 on either side of the stage and your musicians plugin and are good to go.

Once you’ve got your digital mixing console and stage box, you can now fully harness in-ear monitors for your team. While floor wedges work fine, in-ear monitors reduce stage noise, making it easier for the engineer to mix and protects the hearing of your musicians.
Implementing in-ear monitors is a sure way to boost the excellence of your worship band because you can play click tracks, keeping everyone in-time and grooving.

With your digital console and stage box in place, there are a few options on how to equip your team with in-ears. For a really in-depth look, check out Churchfront’s Ultimate Guide to In-Ear Monitors.
Here are a few recommendations for setting up in-ear monitors
A super cheap and easy way to go is purchasing a headphone amp. These small boxes convert the XLR cable from the stage box output to a headphone cable for your musicians. This option is really affordable, around $20 to $50, and works great for stationary musicians like drummers or guitarists. Most of the digital mixing consoles come with apps so your musicians can EQ their own mix as well.
If you’ve got money to spend, you can buy a wireless in-ear monitor system. Of course, how much you spend will translate to how much quality you receive, but you can purchase systems anywhere from $200 to $700 a person–it all depends on the needs of your specific team.
You can use the headphone amps for your stationary, backline musicians and invest in the more expensive wireless systems for your leaders and singers. I love this method because it allows you to tailor your setup to the exact needs of your team and congregation. That’s the benefit of building your audio setup this way–you start with the foundation and build up from there.
After implementing a digital mixer, stage box and in-ear monitors, you’d already ahead of most local churches. You could stop there, but if you want to go further, here’s the rundown on digital audio networking.
Since you’ve got your in-ear monitors set up and ready to go, you’d probably want to run a click track over a DAW (our favorite is Ableton Live) for your musicians. But you’d quickly find that it’s difficult sending multiple channels of audio from the laptop into the mixing console.
You could go the traditional route and purchase a large audio interface which plugs into the computer via USB, sending your analog outputs to the sound console via digital snake, but why go through all that trouble after you just modernized your audio tech?
With digital audio networking, you can send multiple tracks of audio from the laptop right into the mixing console over one, simple ethernet cable. It’s honestly a no brainer: you eliminate a bunch of connections, the sound quality is better and you have greater audio routing flexibility.

There are a number of popular networking protocols such as Waves’ SoundGrid and AVB, but we recommend Dante by Audinate.
To get up-and-running with Dante, you’ll need to purchase the Dante sound card for the mixing console, this comes in at about $600.
Then, you’ll need to install the $30 Dante sound card app for each computer you plan on using in the Dante network. With the sound card app, you’ll have access to, essentially, a virtual audio interface for your computer with 64 inputs and outputs of audio.
Plug in your Dante-enabled devices to your local network over an ethernet cable, and you’re ready to go–instant flexibility and ease-of-use for your musicians and sound team.
As you grow your worship ministry and as you implement more of the latest worship ministry tech, a sound system that includes these parts will be more than ready to accommodate your team’s growth and provide an incredible worship service for your congregation.
To jumpstart this process and discover how to grow as a worship leader and team, fill out this form and schedule a call with me or someone else on the Churchfront team.
We’d love to connect, learn more about your ministry and talk about what it would look like to work together.
Feel free to reach out to us to get started.
There are a ton of digital chord charts for you to choose from, but the OnSong and Music Stand apps are the two best options for worship leaders. In this article, I'll weigh some of the pros and cons of using each one so that you can make the best decision for your ministry team.

The Music Stand app is an add-on to your Planning Center Services subscription which makes it really easy to stay in their ecosystem.
I've been using them for a very long time to:
Plan out my worship gatherings every single weekend
Schedule musicians
Resource my musicians with charts as well as MP3 files
Build out my song library
Sync with Planning Center
Since this app was developed with Planning Center, it automatically syncs with your Planning Center account. You'll be able to view your weekly set list, plans and click on a song to pull up the chord charts.
2. Play MP3 files while using your digital chord chart
In Planning Center, you can link the MP3 file of the song to the chord chart and play it while you go through, and it’s a great way for your other musicians to practice the songs at home.
3. Annotate songs
There are lots of great annotation features built into this app.
Highlight sections of the song with different colors
Jot down notes
Save all your annotations and access them whenever
Planning Center is a subscription-based software and you can select the plans and services that fits your church.
I’ve included some of the pricing breakdowns below:
Free: If you only have five members, then this will work for you.
Just Music Stand App: $5 a month.
Planning Center + Music Stand: $16


There are a lot of similarities between OnSong and Music Stand, but I think OnSong has an edge over Music Stand because creating a chord chart is its main thing. Not just an add-on feature.
Organize your songs
You can get to a greater level of organizing your song assets by arranging them into sets and books.
Import set lists
If you create a grouping of songs on Planning Center, you can sync it with OnSong.
Select Planning Center > Select what service I want > Import > Update
Reformat your chord chart for easy readability
This is where I think OnSong starts to shine brighter than Music Stand. You can turn the font size and brightness, bold the chords and change the text color.
Send messages to your band through the app
It also has a really strong communication feature for talking to the rest of your band members. If you’re on the same wifi network, you can send them commands like “Start” and “Stop.” I think this is a great way to communicate with them in the middle of a service.
5. Add midi functions
OnSong has some cool features when it comes to being able to use midi communication to change the song that you're seeing in your app. Using Ableton Live, you could put a midi queue at the beginning of each song that then maps to the appropriate song within OnSong.
Musicians would never have to touch their iPad throughout worship
The app would automatically flip to the right song
You could even get it to scroll to the right section of a song.
This is a really powerful feature, and I think it gets a little crazy. Personally, I think that instead of setting up the midi automation, you could just memorize the chords and lyrics to your music.
At the end of the day, both are great apps..
If you’re just looking for a simple cord chart, go with Music Stand (like I do)
If you’re interested in an app with more technical capabilities, try out Onstage.
If you need some more training for how to use apps like Planning Center, how to prepare chord charts and other practice resources for your worship ministry, then check out Worship Leader School.
We've got a large set of online courses library to teach you:
✅How to create efficient systems and processes
✅How to resource your band well
✅How to improve in your pastoral responsibilities
✅You’ll even get access to my team for real time support and coaching
We have the resources, classes and community to help you reach your fullest potential as a worship leader. So check out Worship Leader School so you can grow yourself and your ministry.
Controlling Lightkey with ProPresenter is an incredibly fast way to ensure that your lyrics, lights and other elements are perfectly timed and synced. Having clean transitions between these various elements is a simple, but powerful way to create a beautiful worship service that fully immerses your church community.
There are different pieces that need to come together, but I’m going to show you a straightforward method on how to get each element talking to each other to control Lightkey with ProPresenter.
Go to ProPresenter Preferences > Modules > Demo Modules

2. Once you’ve done that, the Midi module will show up in the Communications tab, and it’ll be ready to go.

Next, you want to set up the Inter-Application Communication (IAC) driver which is at the core of this setup because Propresenter and Lightkey talk to each other via the IAC driver.
Go to Audio MIDI Setup app on your Mac > Window > Show Midi Studio > IAC Driver > Create a new IAC Driver Bus.

There are a lot of windows here. Just pull up MIDI studio and then hit IAC driver.
2. Name the bus and call it “I Want to Join Worship Leader School” > Hit Apply.
Now let's make sure that ProPresenter is able to send out MIDI signals. Because we're sending signals from ProPresenter to the IAC driver and then into LightKey, we need to make sure that the preferences are set right for ProPresenter.
Go back to the Communications Module > Add Device > MIDI > select the proper destination(which is I Want To Join Worship Leader School) > Save > Hit the Connect button.

2. Now ProPresenter is able to start sending MIDI output. You're good to go on ProPresenter's end.
Since Propresenter is sending signals to the MIDI Driver to Lightkey, we need to make sure that Lightkey will receive the commands from ProPresenter by setting up Lightkey’s external control.
In Lightkey, go to Preferences > External Control > Inputs.
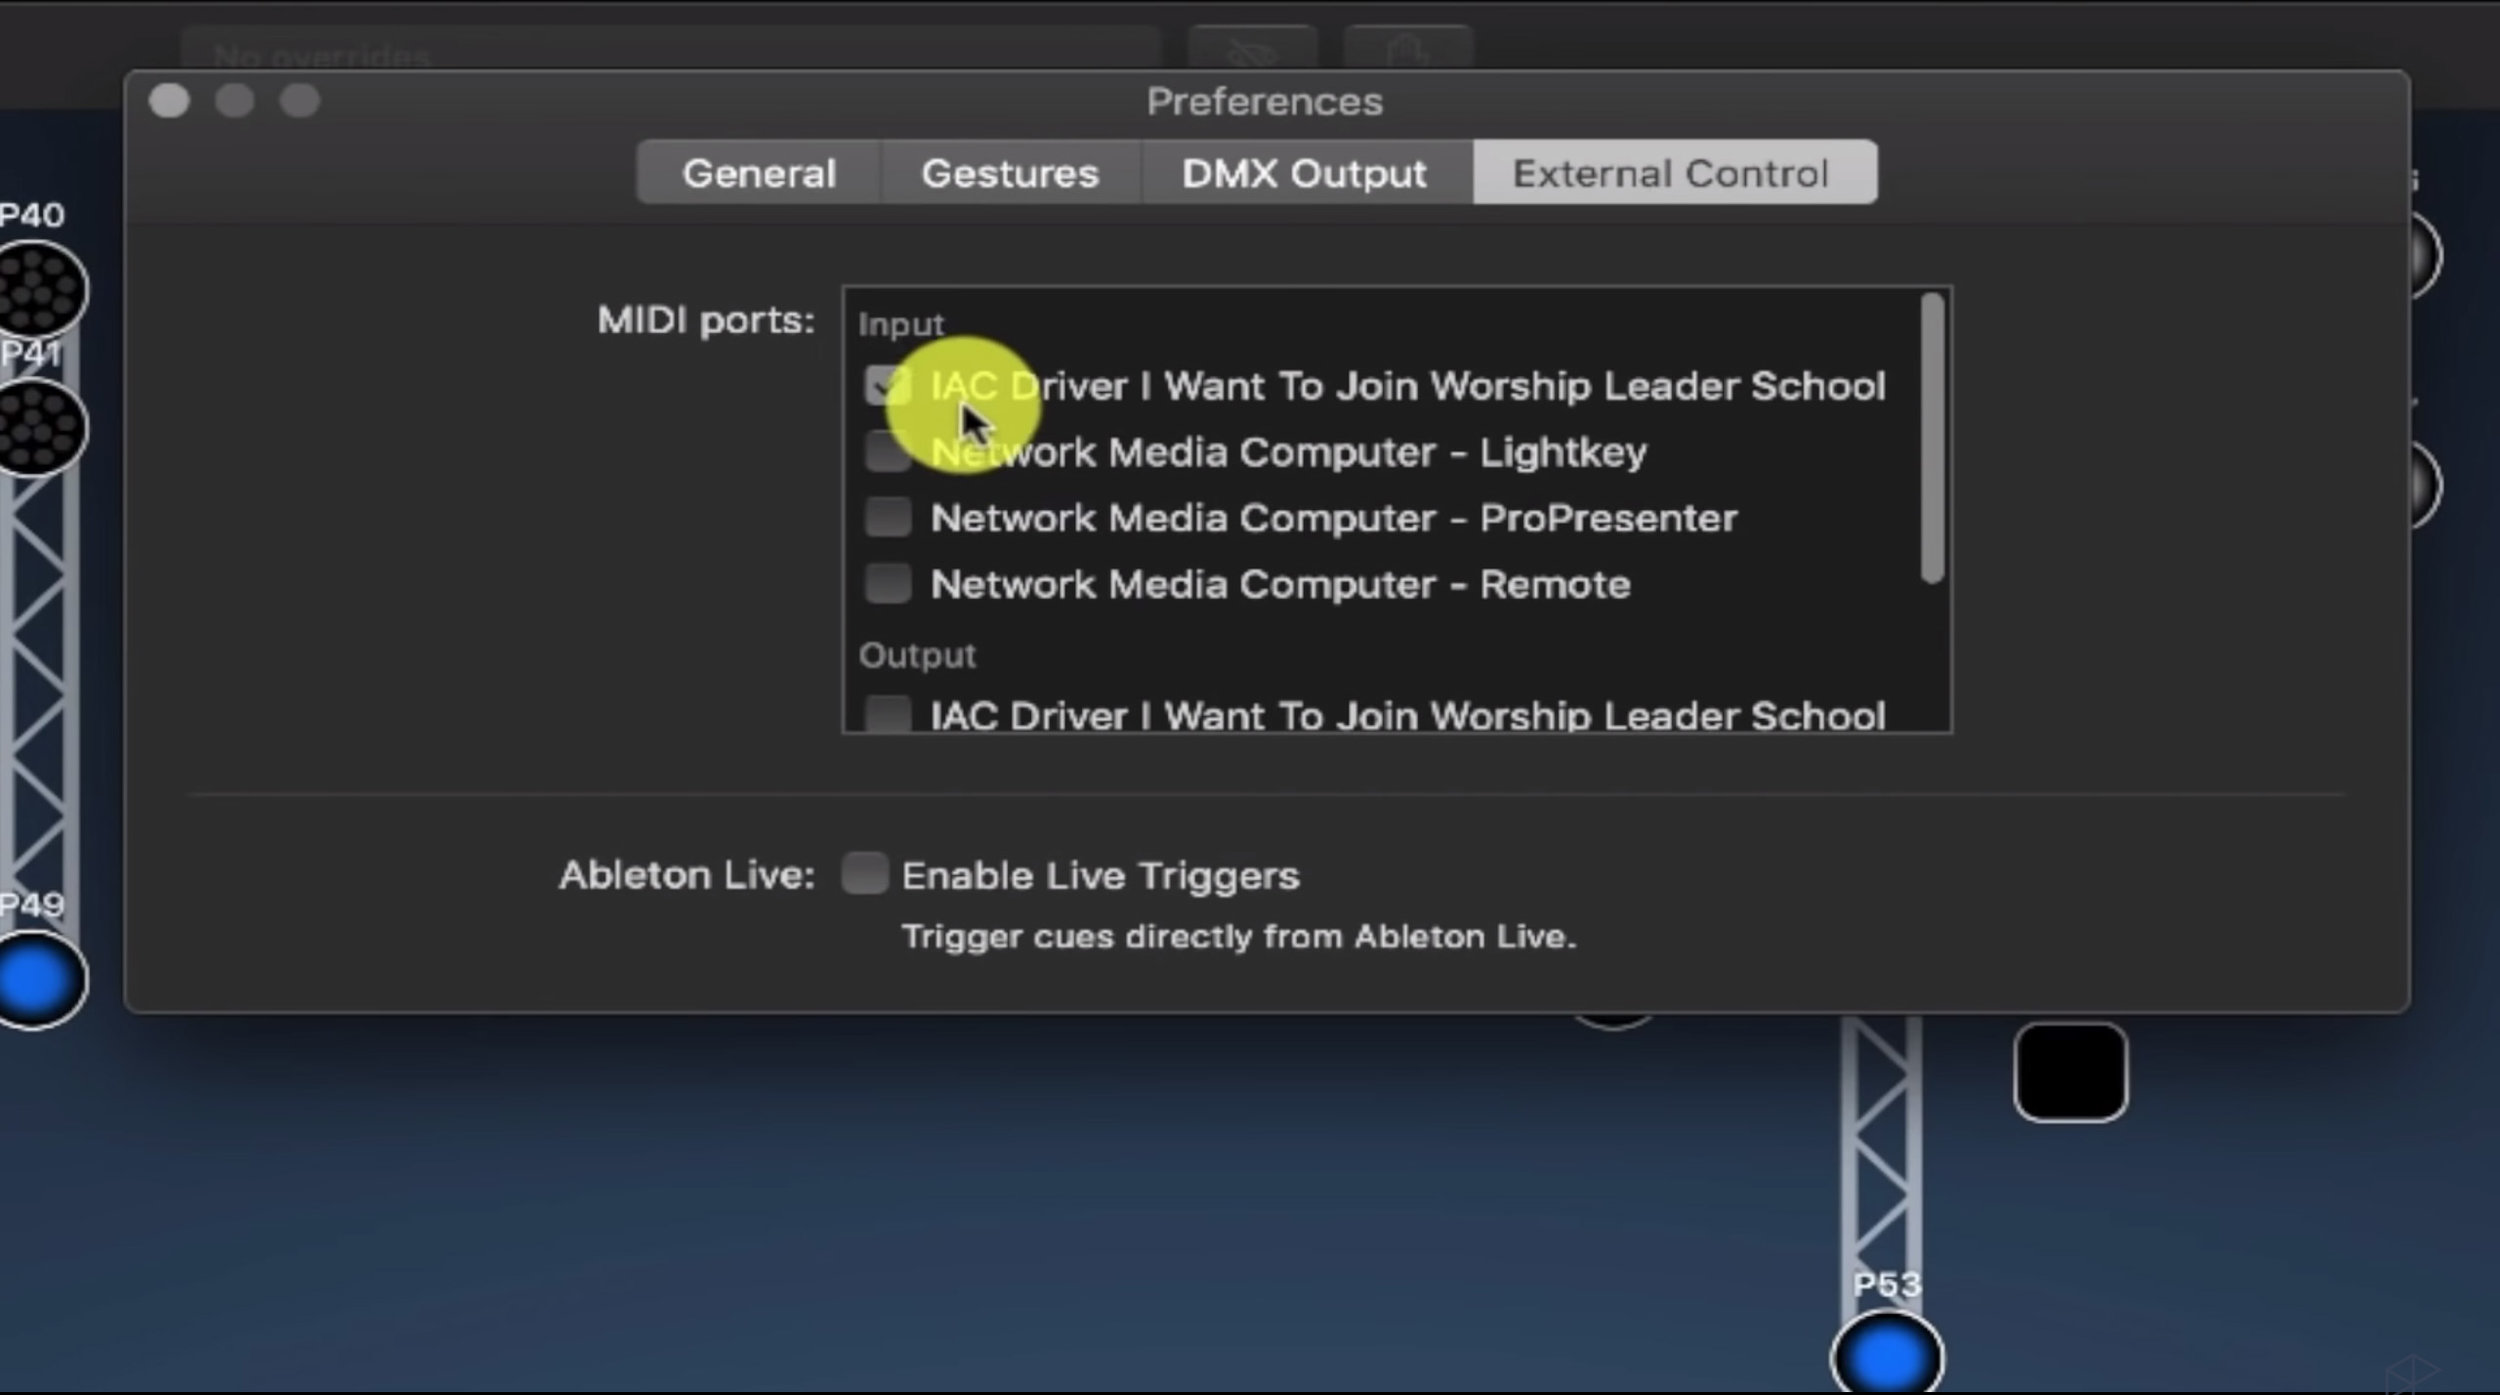
2. Select the IAC Driver I Want To Join Worship Leader School. (Make sure it’s under the Input section.)
3. Now LightKey can receive those MIDI commands from the IAC driver, which is receiving MIDI commands from ProPresenter.
Protip: If the IAC Driver doesn’t show up on the first go in Lightkey, restart the program and then it’ll show up.
The next thing you need to do in LightKey is make sure you have MIDI notes assigned to the different cues within LightKey.
I have a Ableton project that sends notes over to LightKey because we automate all of our lighting changes. If you need to set this up for the first time all you need to do is:
In Lightkey, go to Create a New Cue > Make A New Button > Call it Cue 1
Then, go to External Control window > Hit the Plus icon, and you'll be able to add a new note.
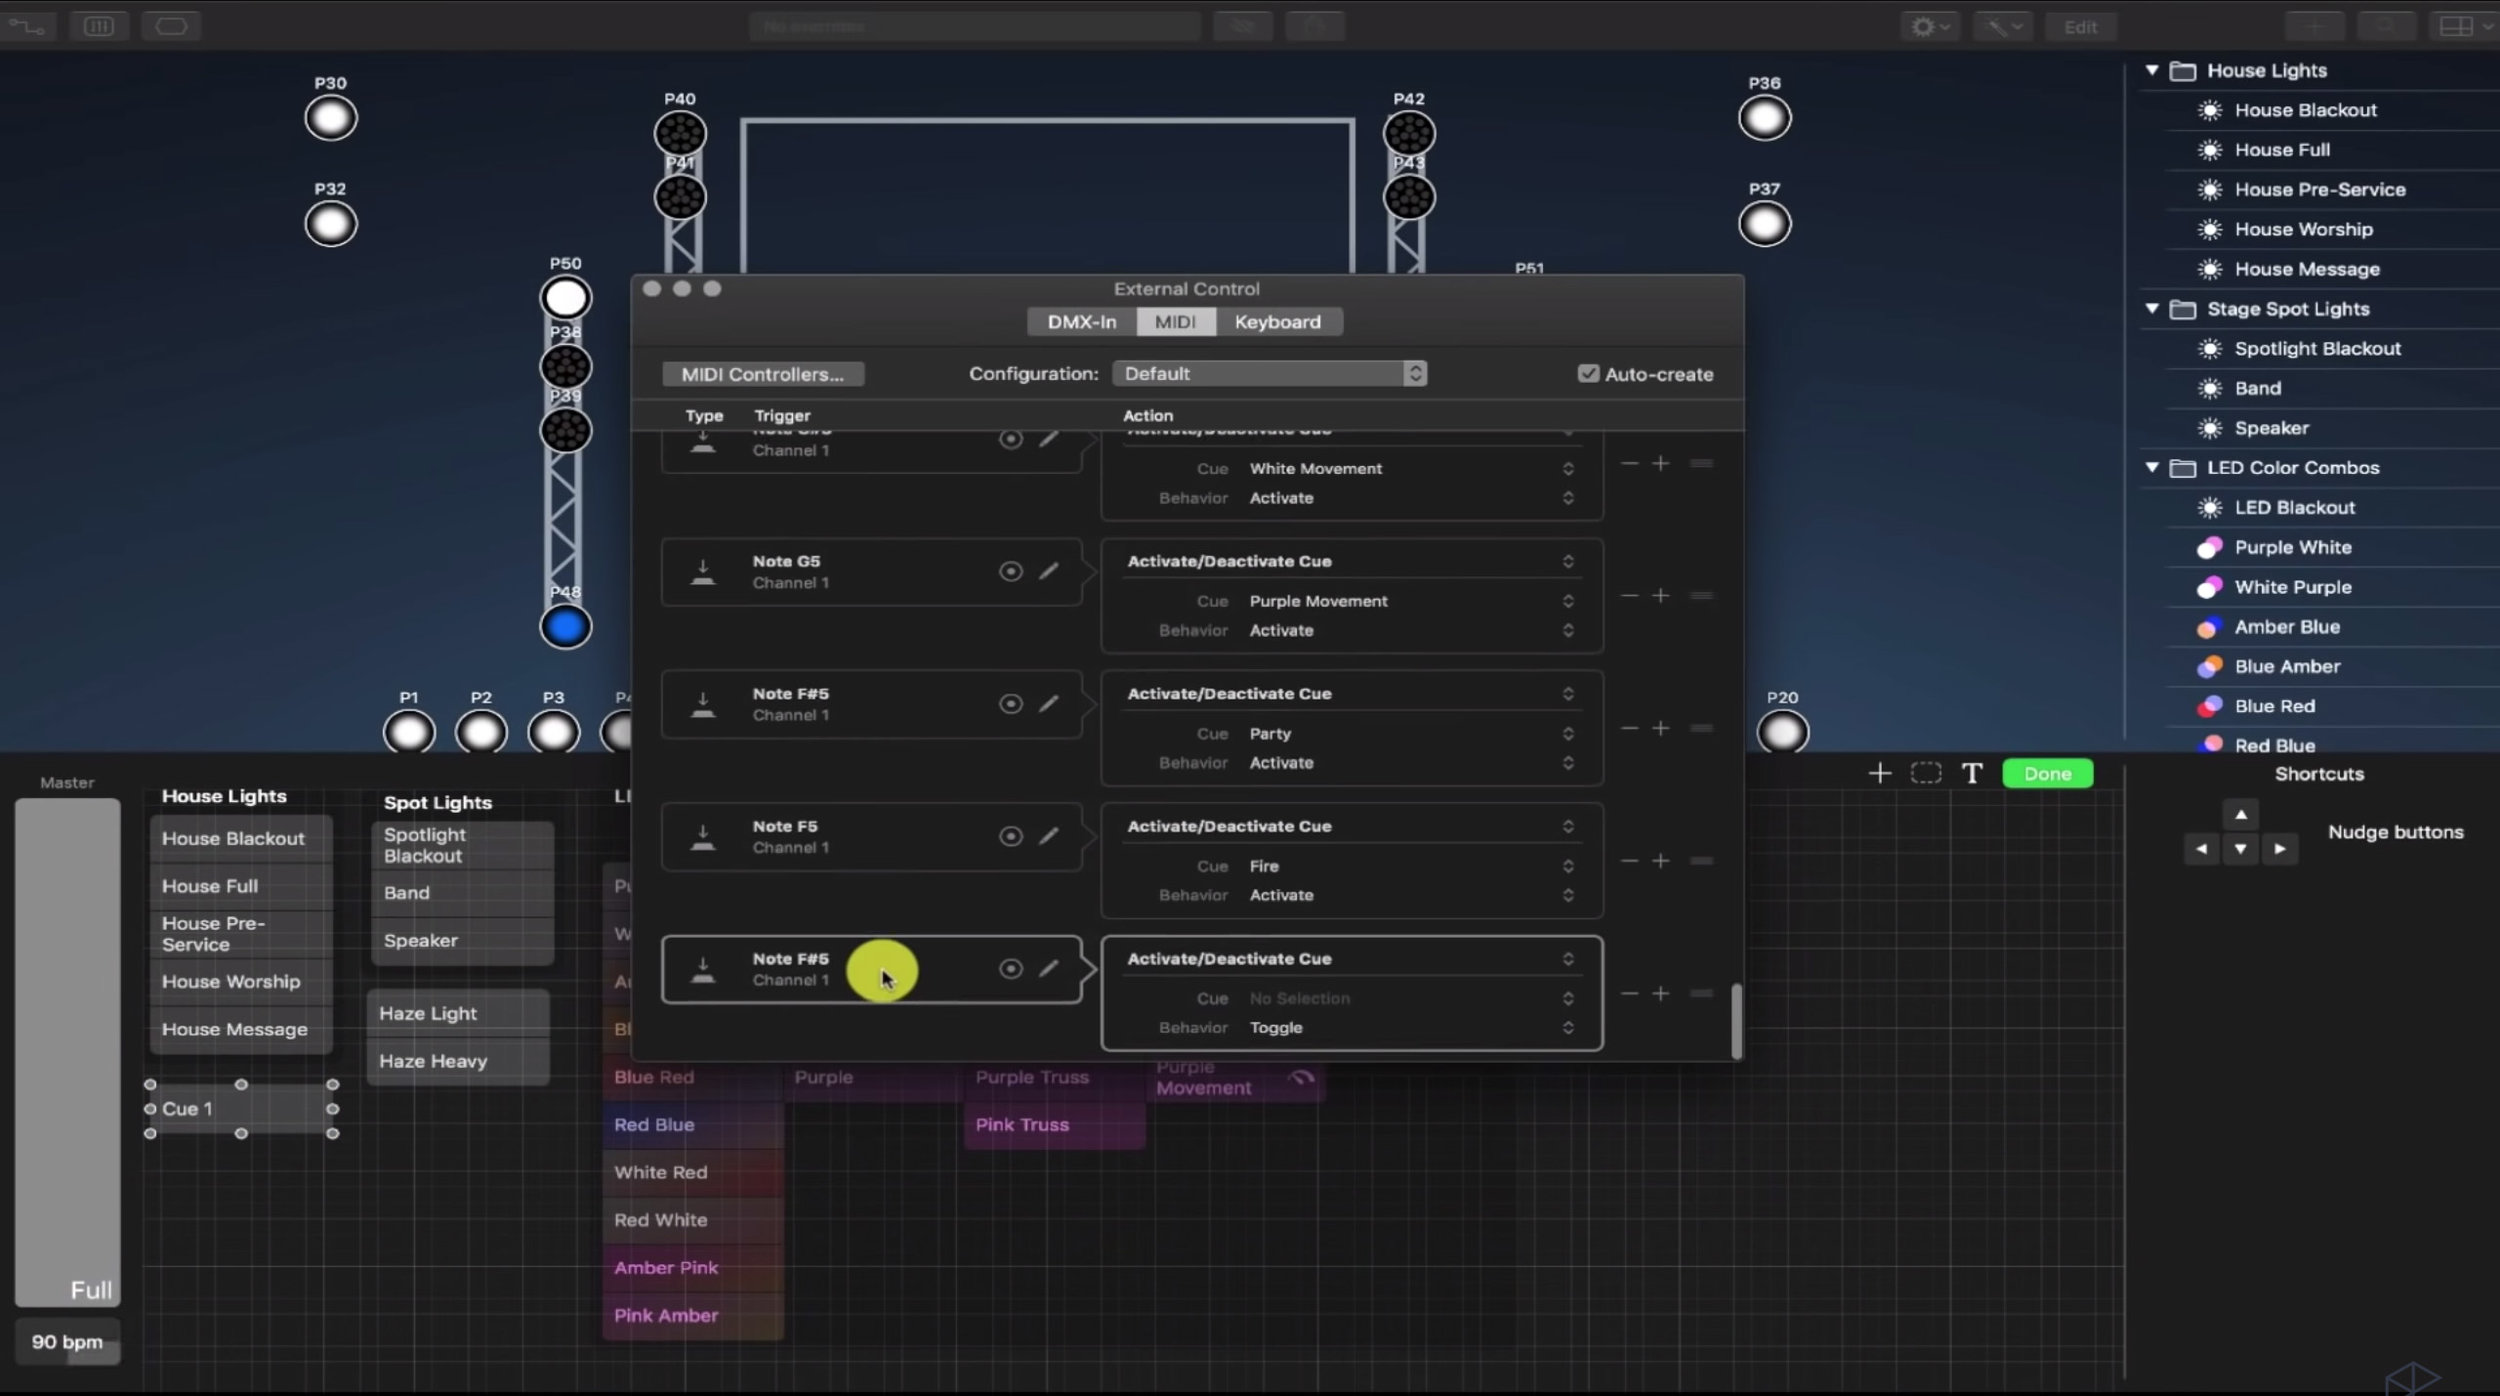
3. After you add a new note (on the left side of the window), go to Activate/Deactivate Cue (on the right side of the window).
4. Select the cue you want to add (in this case Cue 1).
5. Set the behavior as Activate.
6. So any time Lightkey receives the F#5 note, Cue 1 is going to be activated.
So now let's say we want to have a certain look for the song King of My Heart.I'm going to tell ProPresenter to send the right MIDI note to LightKey to cue up the right scene.
We need to make sure to select the scene we want in Lightkey. We want Lightkey to turn the lights onstage to purple. So In this case we’ll call the scene the Purple scene .
Then we need to find the scene’s Midi Control Name
Right click Purple > External Control > the name, D5, is at the top
Then we’ll go to ProPresenter > Right click on the first slide > Add Cue > Add Communication Cue > MIDI > MIDI Note On > Then I'm going to tell it to be D5.

4. Then you can set the intensity to whatever you want.
5. Now you can click on the slide in ProPresenter and watch as the Purple lights are activated on stage in Lightkey.
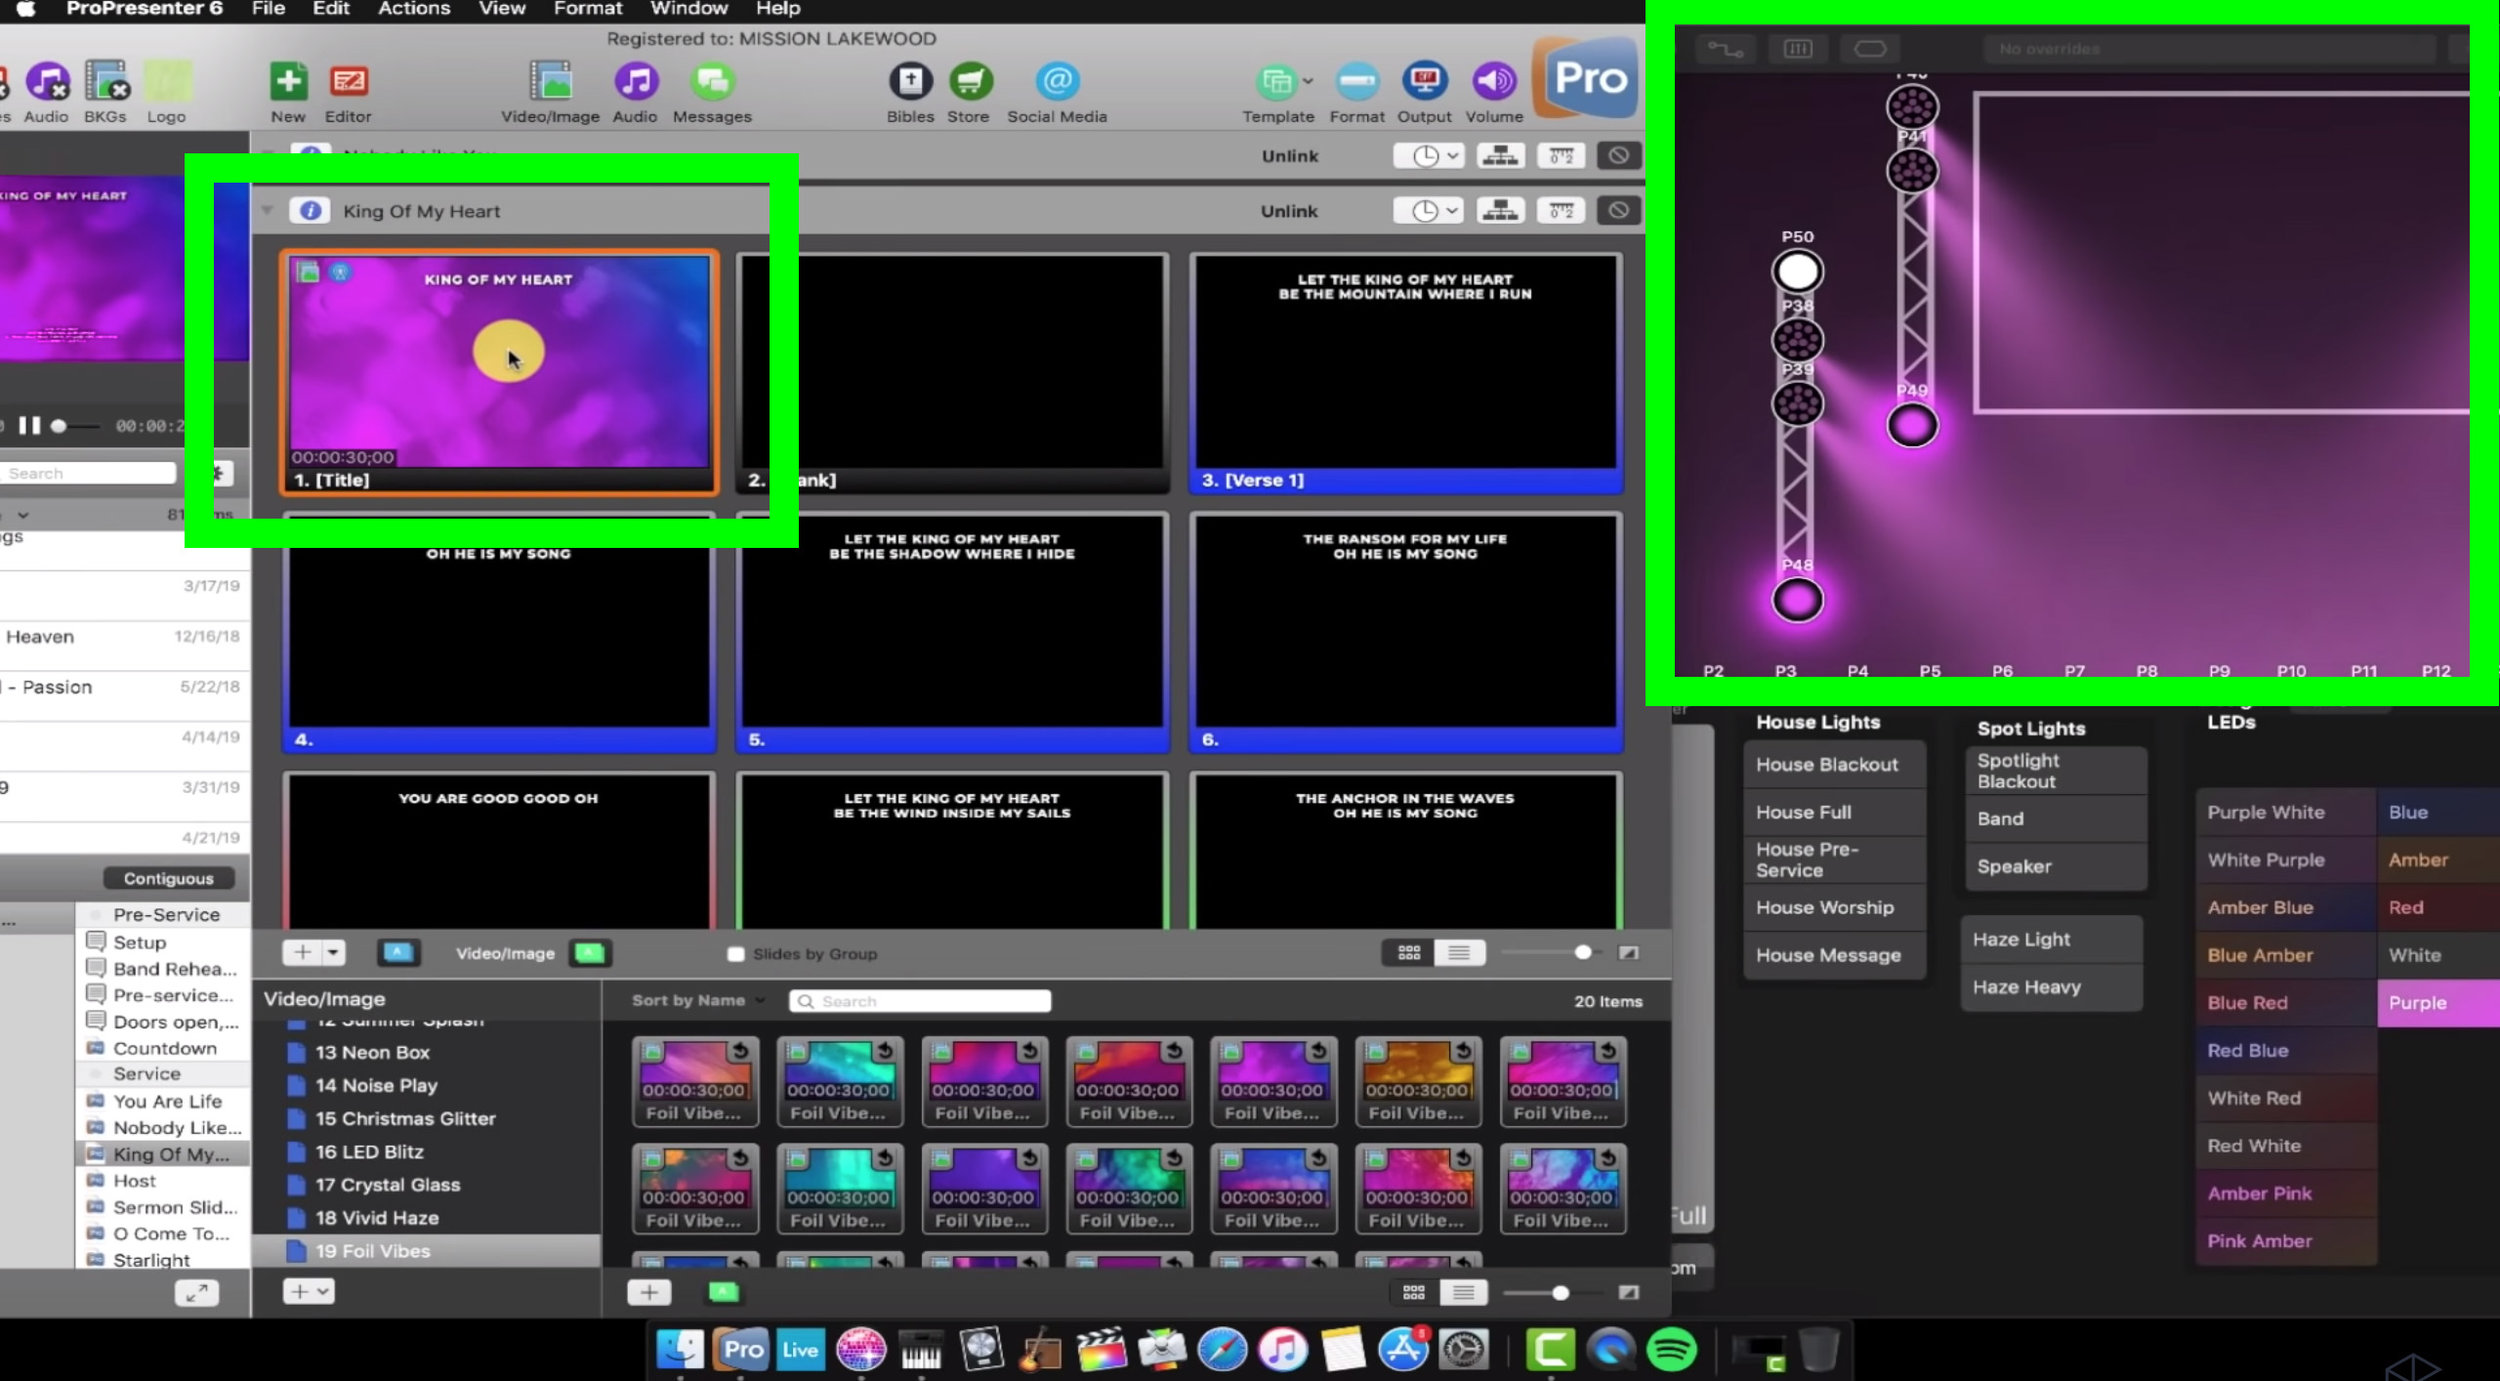
The green square on the left is ProPresenter which you click. The green square on the right shows how the stage lights will look in Lightkey.
Now we want to practice turning down the band lights during another cue.
All I need to do is go to the
Band Lights Cue in Lightkey > Right click > External Control > Find the Midi name with is C#8
Then I go to ProPresenter > Find the slide I want it to use it on > Right click > Add Cue > Communications Cue > Midi Note: On

And that is how you automate LightKey with ProPresenter. You just need to know the midi notes, you need to have them communicate to each other via the IAC driver and then just start adding whatever cues you want.
If you’re interested in continuing to develop your worship leading skills with great classes like this, I’ve created two great ways to help you become an incredible worship leader.
Worship Leaders School: A site and series of courses that covers how to lead engaging worship, how to become a great worship pastor and build systems and teams to grow your ministry.
Worship Tech School: This site is brand new, and will teach you how to be a complete ninja with the latest and greatest software for worship. Sign up to join the waitlist.
Feel free to choose one depending on your role in your ministry. Then choose a time to chat with me and we’ll connect about how these courses can help you.
My goal in this is to give you and your keyboardist a common terminology so that you can communicate more effectively, identify what sounds you want and produce a well designed performance that evokes powerful emotions and connections in your church community.
The first word I want to address is the word “warm.” Stuff is called warm all the time but it's hard to quantify what that means.
A warm sound is a pad that has this nice low-mid energy. It's not getting in the way, it's not sitting on top of what the electric guitars, vocals, bass or the kick drum might be doing. It's serving as a foundation underneath everything.
It doesn't have any of that bright sizzle on top that can distract from quieter moments. Instead, it adds a feeling of connectedness and intimacy.
Protip: One of the really important things about finding a warm a pad is to make sure it's not too static. You want there to still be some motion and energy–what we call a little bit of modulation.
Check out the example below to hear what I’m talking about.
Next, let's talk about the bright sound. This is the opposite side of the warm sound.
When I think of bright, we're talking about stuff in the higher frequency spectrum that's actually maybe above or right alongside what the guitars are doing. That has a lot of energy on the top end that's perceived as more aggressive, more powerful and it's more complex harmonically. You might still be playing in the same range on the keyboard but there are harmonic frequencies on top of it that add a little bit of extra energy.
Oftentimes with these bright synth pad sounds, you're still serving as the foundation to the mix, holding everything else together, but you're able to dynamically lift as your drummer switches to the high hat or starts washing out cymbals and as your electric guitarists start playing with more intensity. This increase in brightness from the pad goes right along with that; still serving as the foundation but rising as everyone does too.
Lastly, let's talk about the most overused buzzword right now in the worship space–the shimmer pad.
You can have a shimmery texture or quality to your pad sounds which does something really specific in the mix, but it's really easy to overuse this kind of effect and overwhelm what your vocalist or your guitarist is doing.
It’s still worth using, but you have to make sure that you clarify why you're using this type of sound and where this type of pad sound actually sits in the mix.
Check out the example below to hear the proper balance that doesn’t overwhelm everything else.
Now let’s talk about how a couple simple effects from software like Mainstage or Ableton can greatly increase the quality of your music and make them sound more like today's top worship songs.
First off, I want to talk about reverb. If you're a guitarist, I'm sure you're probably familiar with the effect that reverb can have. You can use it on keys in the same way.
Reverb adds a sense of size, depth and space to your sound. It can soften up the initial impression of what you're playing, create some room and increase the hang time of your chord.
Now, let's talk about delay. All the guitarists discovered delay in 2002, and keyboard players are just getting around to it now.
In the same way that you can change the character and the rhythmic complexity of an electric guitar with delay, you can achieve a lot of the same cool effects with piano.
This is commonly used on some slow songs where you'll hit a chord on the one, and let the delay trail sort of add that extra oomph to it. You can also use it when you're playing the piano as a lead instrument, to give you an extra bit of memorability to a bridge or something like that.
In really powerful worship moments, it can also add more texture and make the piano sound a little bit more interesting.
Lastly, I want to return to shimmer. We already talked about shimmer when it comes to a pad, but you can also apply shimmer as an effect to any sound that you have.
When I’m playing the piano all I have to do is turn on the shimmer reverb. The shimmer will swell in behind what I'm doing and then swell back down. If I'm moving through chords, it's never overwhelming the initial playing, and it feels really organic and natural.
It's a really great effect to give your keys players because it's got a nice production value element to it, it adds an ethereal ambience and it doesn't require a lot of theory knowledge to use. As long as you're not overplaying, it's going to make you sound like you know what you're doing.
So those are six fundamental terms for you and your keyboardist. My hope is that it empowers both of you to create a powerful experience for the people you’re leading.
If you want to take the next step with this training and dive deep into equipping and empowering the keyboardist in your worship band, then check out Worship Leader School. David has created an entire masterclass exclusively for members that will:
✅Give you a deep dive into the effects that we touched on today.
✅ Show you an in-depth tour of all the gear and software for this setup.
✅Explain how to communicate and work alongside your keyboard player so you have smooth transitions in worship
I’d love to chat about how this class can help you grow as a worship leader.
Feel free to setup a call here.
Talk soon.


