
How to create a digital audio network for your worship ministry, and eliminate the need for audio interfaces using the Dante Protocol.

There are a ton of digital chord charts for you to choose from, but the OnSong and Music Stand apps are the two best options for worship leaders. In this article, I'll weigh some of the pros and cons of using each one so that you can make the best decision for your ministry team.

The Music Stand app is an add-on to your Planning Center Services subscription which makes it really easy to stay in their ecosystem.
I've been using them for a very long time to:
Plan out my worship gatherings every single weekend
Schedule musicians
Resource my musicians with charts as well as MP3 files
Build out my song library
Sync with Planning Center
Since this app was developed with Planning Center, it automatically syncs with your Planning Center account. You'll be able to view your weekly set list, plans and click on a song to pull up the chord charts.
2. Play MP3 files while using your digital chord chart
In Planning Center, you can link the MP3 file of the song to the chord chart and play it while you go through, and it’s a great way for your other musicians to practice the songs at home.
3. Annotate songs
There are lots of great annotation features built into this app.
Highlight sections of the song with different colors
Jot down notes
Save all your annotations and access them whenever
Planning Center is a subscription-based software and you can select the plans and services that fits your church.
I’ve included some of the pricing breakdowns below:
Free: If you only have five members, then this will work for you.
Just Music Stand App: $5 a month.
Planning Center + Music Stand: $16


There are a lot of similarities between OnSong and Music Stand, but I think OnSong has an edge over Music Stand because creating a chord chart is its main thing. Not just an add-on feature.
Organize your songs
You can get to a greater level of organizing your song assets by arranging them into sets and books.
Import set lists
If you create a grouping of songs on Planning Center, you can sync it with OnSong.
Select Planning Center > Select what service I want > Import > Update
Reformat your chord chart for easy readability
This is where I think OnSong starts to shine brighter than Music Stand. You can turn the font size and brightness, bold the chords and change the text color.
Send messages to your band through the app
It also has a really strong communication feature for talking to the rest of your band members. If you’re on the same wifi network, you can send them commands like “Start” and “Stop.” I think this is a great way to communicate with them in the middle of a service.
5. Add midi functions
OnSong has some cool features when it comes to being able to use midi communication to change the song that you're seeing in your app. Using Ableton Live, you could put a midi queue at the beginning of each song that then maps to the appropriate song within OnSong.
Musicians would never have to touch their iPad throughout worship
The app would automatically flip to the right song
You could even get it to scroll to the right section of a song.
This is a really powerful feature, and I think it gets a little crazy. Personally, I think that instead of setting up the midi automation, you could just memorize the chords and lyrics to your music.
At the end of the day, both are great apps..
If you’re just looking for a simple cord chart, go with Music Stand (like I do)
If you’re interested in an app with more technical capabilities, try out Onstage.
If you need some more training for how to use apps like Planning Center, how to prepare chord charts and other practice resources for your worship ministry, then check out Worship Leader School.
We've got a large set of online courses library to teach you:
✅How to create efficient systems and processes
✅How to resource your band well
✅How to improve in your pastoral responsibilities
✅You’ll even get access to my team for real time support and coaching
We have the resources, classes and community to help you reach your fullest potential as a worship leader. So check out Worship Leader School so you can grow yourself and your ministry.
Controlling Lightkey with ProPresenter is an incredibly fast way to ensure that your lyrics, lights and other elements are perfectly timed and synced. Having clean transitions between these various elements is a simple, but powerful way to create a beautiful worship service that fully immerses your church community.
There are different pieces that need to come together, but I’m going to show you a straightforward method on how to get each element talking to each other to control Lightkey with ProPresenter.
Go to ProPresenter Preferences > Modules > Demo Modules

2. Once you’ve done that, the Midi module will show up in the Communications tab, and it’ll be ready to go.

Next, you want to set up the Inter-Application Communication (IAC) driver which is at the core of this setup because Propresenter and Lightkey talk to each other via the IAC driver.
Go to Audio MIDI Setup app on your Mac > Window > Show Midi Studio > IAC Driver > Create a new IAC Driver Bus.

There are a lot of windows here. Just pull up MIDI studio and then hit IAC driver.
2. Name the bus and call it “I Want to Join Worship Leader School” > Hit Apply.
Now let's make sure that ProPresenter is able to send out MIDI signals. Because we're sending signals from ProPresenter to the IAC driver and then into LightKey, we need to make sure that the preferences are set right for ProPresenter.
Go back to the Communications Module > Add Device > MIDI > select the proper destination(which is I Want To Join Worship Leader School) > Save > Hit the Connect button.

2. Now ProPresenter is able to start sending MIDI output. You're good to go on ProPresenter's end.
Since Propresenter is sending signals to the MIDI Driver to Lightkey, we need to make sure that Lightkey will receive the commands from ProPresenter by setting up Lightkey’s external control.
In Lightkey, go to Preferences > External Control > Inputs.
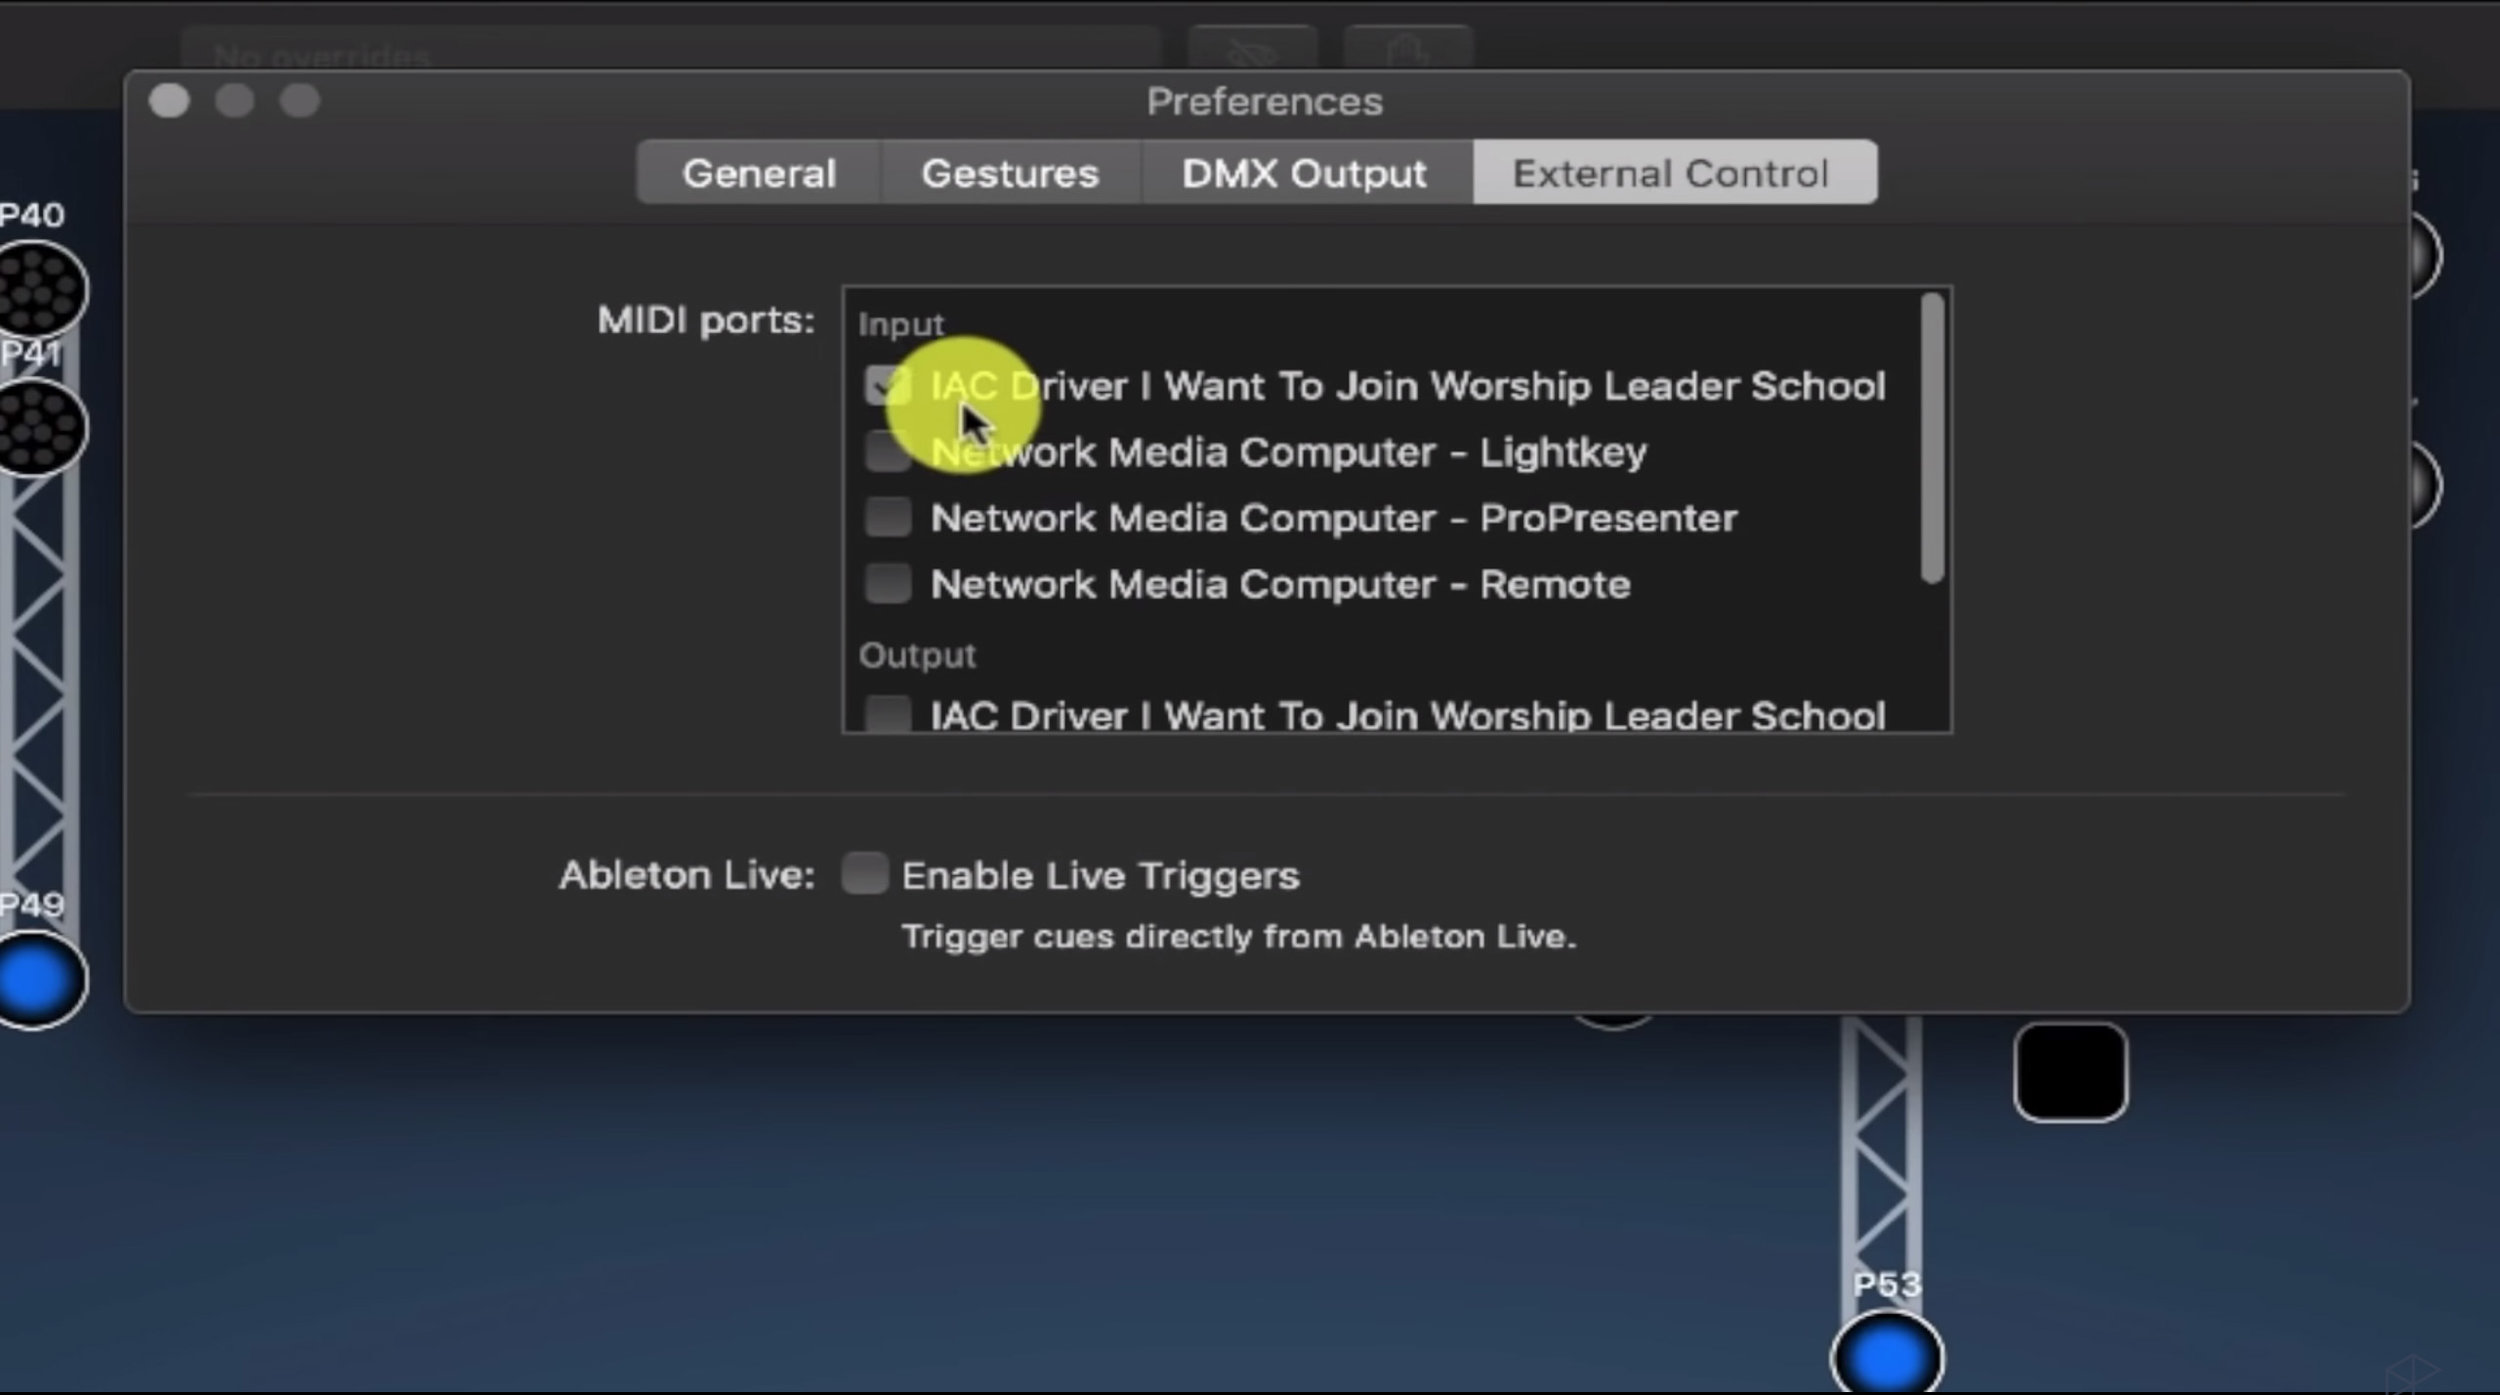
2. Select the IAC Driver I Want To Join Worship Leader School. (Make sure it’s under the Input section.)
3. Now LightKey can receive those MIDI commands from the IAC driver, which is receiving MIDI commands from ProPresenter.
Protip: If the IAC Driver doesn’t show up on the first go in Lightkey, restart the program and then it’ll show up.
The next thing you need to do in LightKey is make sure you have MIDI notes assigned to the different cues within LightKey.
I have a Ableton project that sends notes over to LightKey because we automate all of our lighting changes. If you need to set this up for the first time all you need to do is:
In Lightkey, go to Create a New Cue > Make A New Button > Call it Cue 1
Then, go to External Control window > Hit the Plus icon, and you'll be able to add a new note.
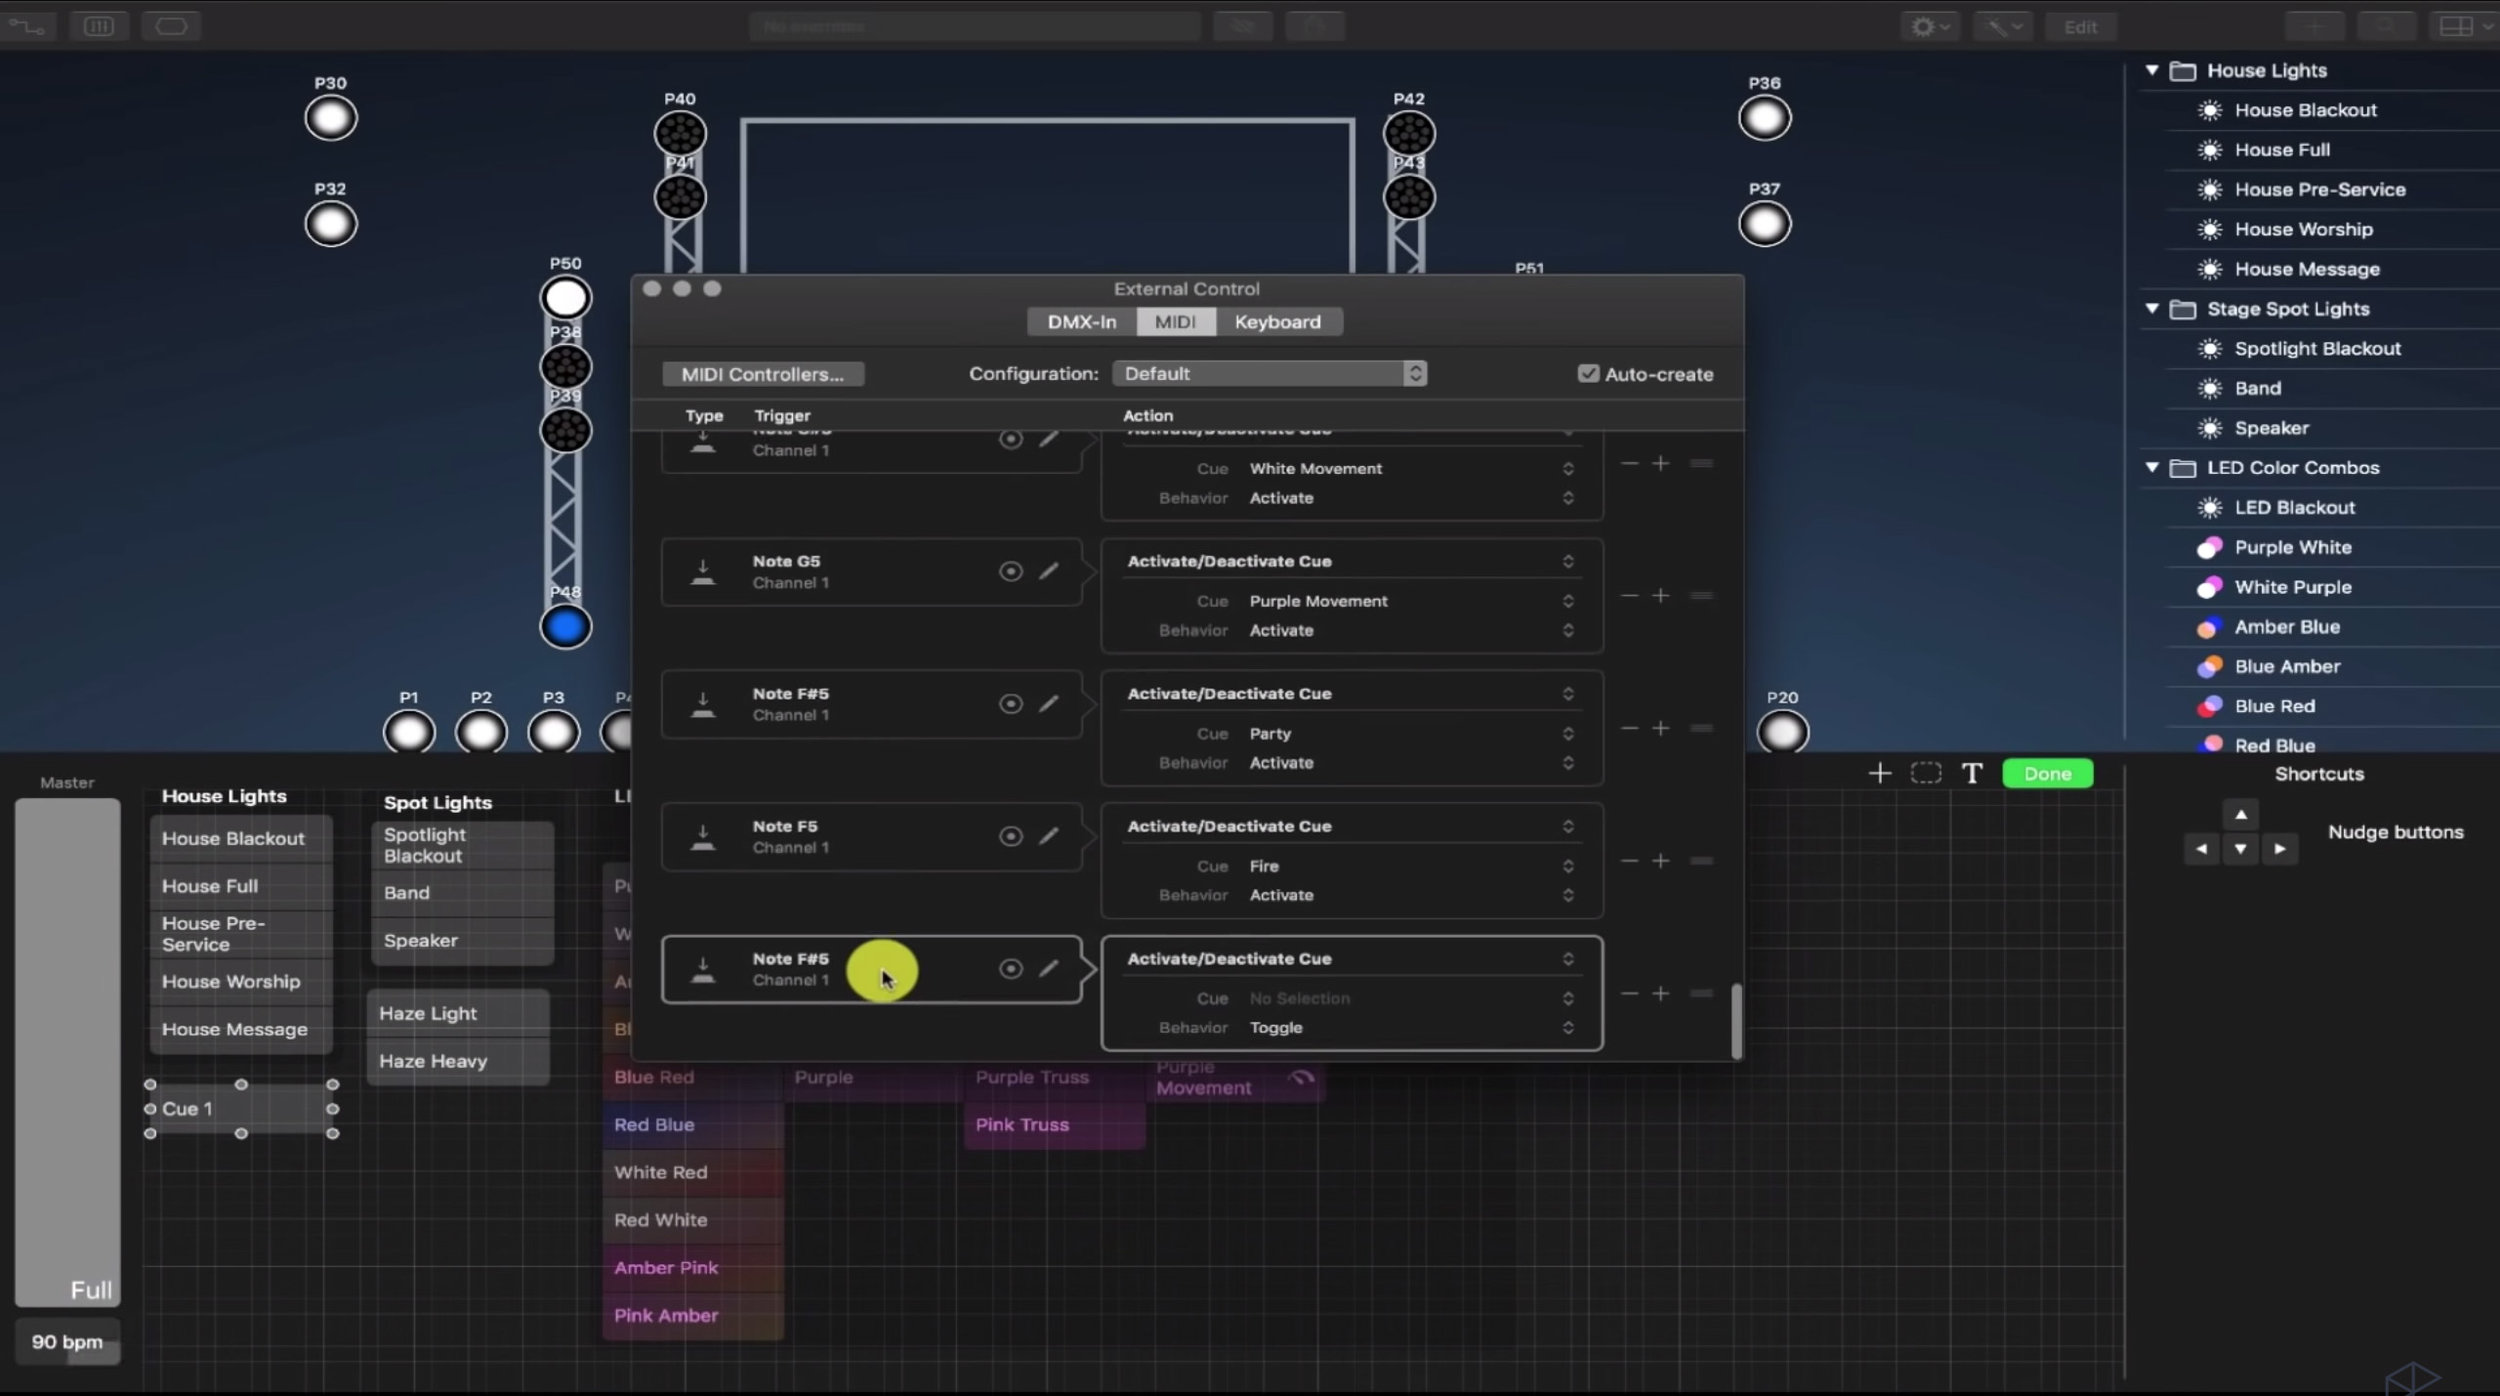
3. After you add a new note (on the left side of the window), go to Activate/Deactivate Cue (on the right side of the window).
4. Select the cue you want to add (in this case Cue 1).
5. Set the behavior as Activate.
6. So any time Lightkey receives the F#5 note, Cue 1 is going to be activated.
So now let's say we want to have a certain look for the song King of My Heart.I'm going to tell ProPresenter to send the right MIDI note to LightKey to cue up the right scene.
We need to make sure to select the scene we want in Lightkey. We want Lightkey to turn the lights onstage to purple. So In this case we’ll call the scene the Purple scene .
Then we need to find the scene’s Midi Control Name
Right click Purple > External Control > the name, D5, is at the top
Then we’ll go to ProPresenter > Right click on the first slide > Add Cue > Add Communication Cue > MIDI > MIDI Note On > Then I'm going to tell it to be D5.

4. Then you can set the intensity to whatever you want.
5. Now you can click on the slide in ProPresenter and watch as the Purple lights are activated on stage in Lightkey.
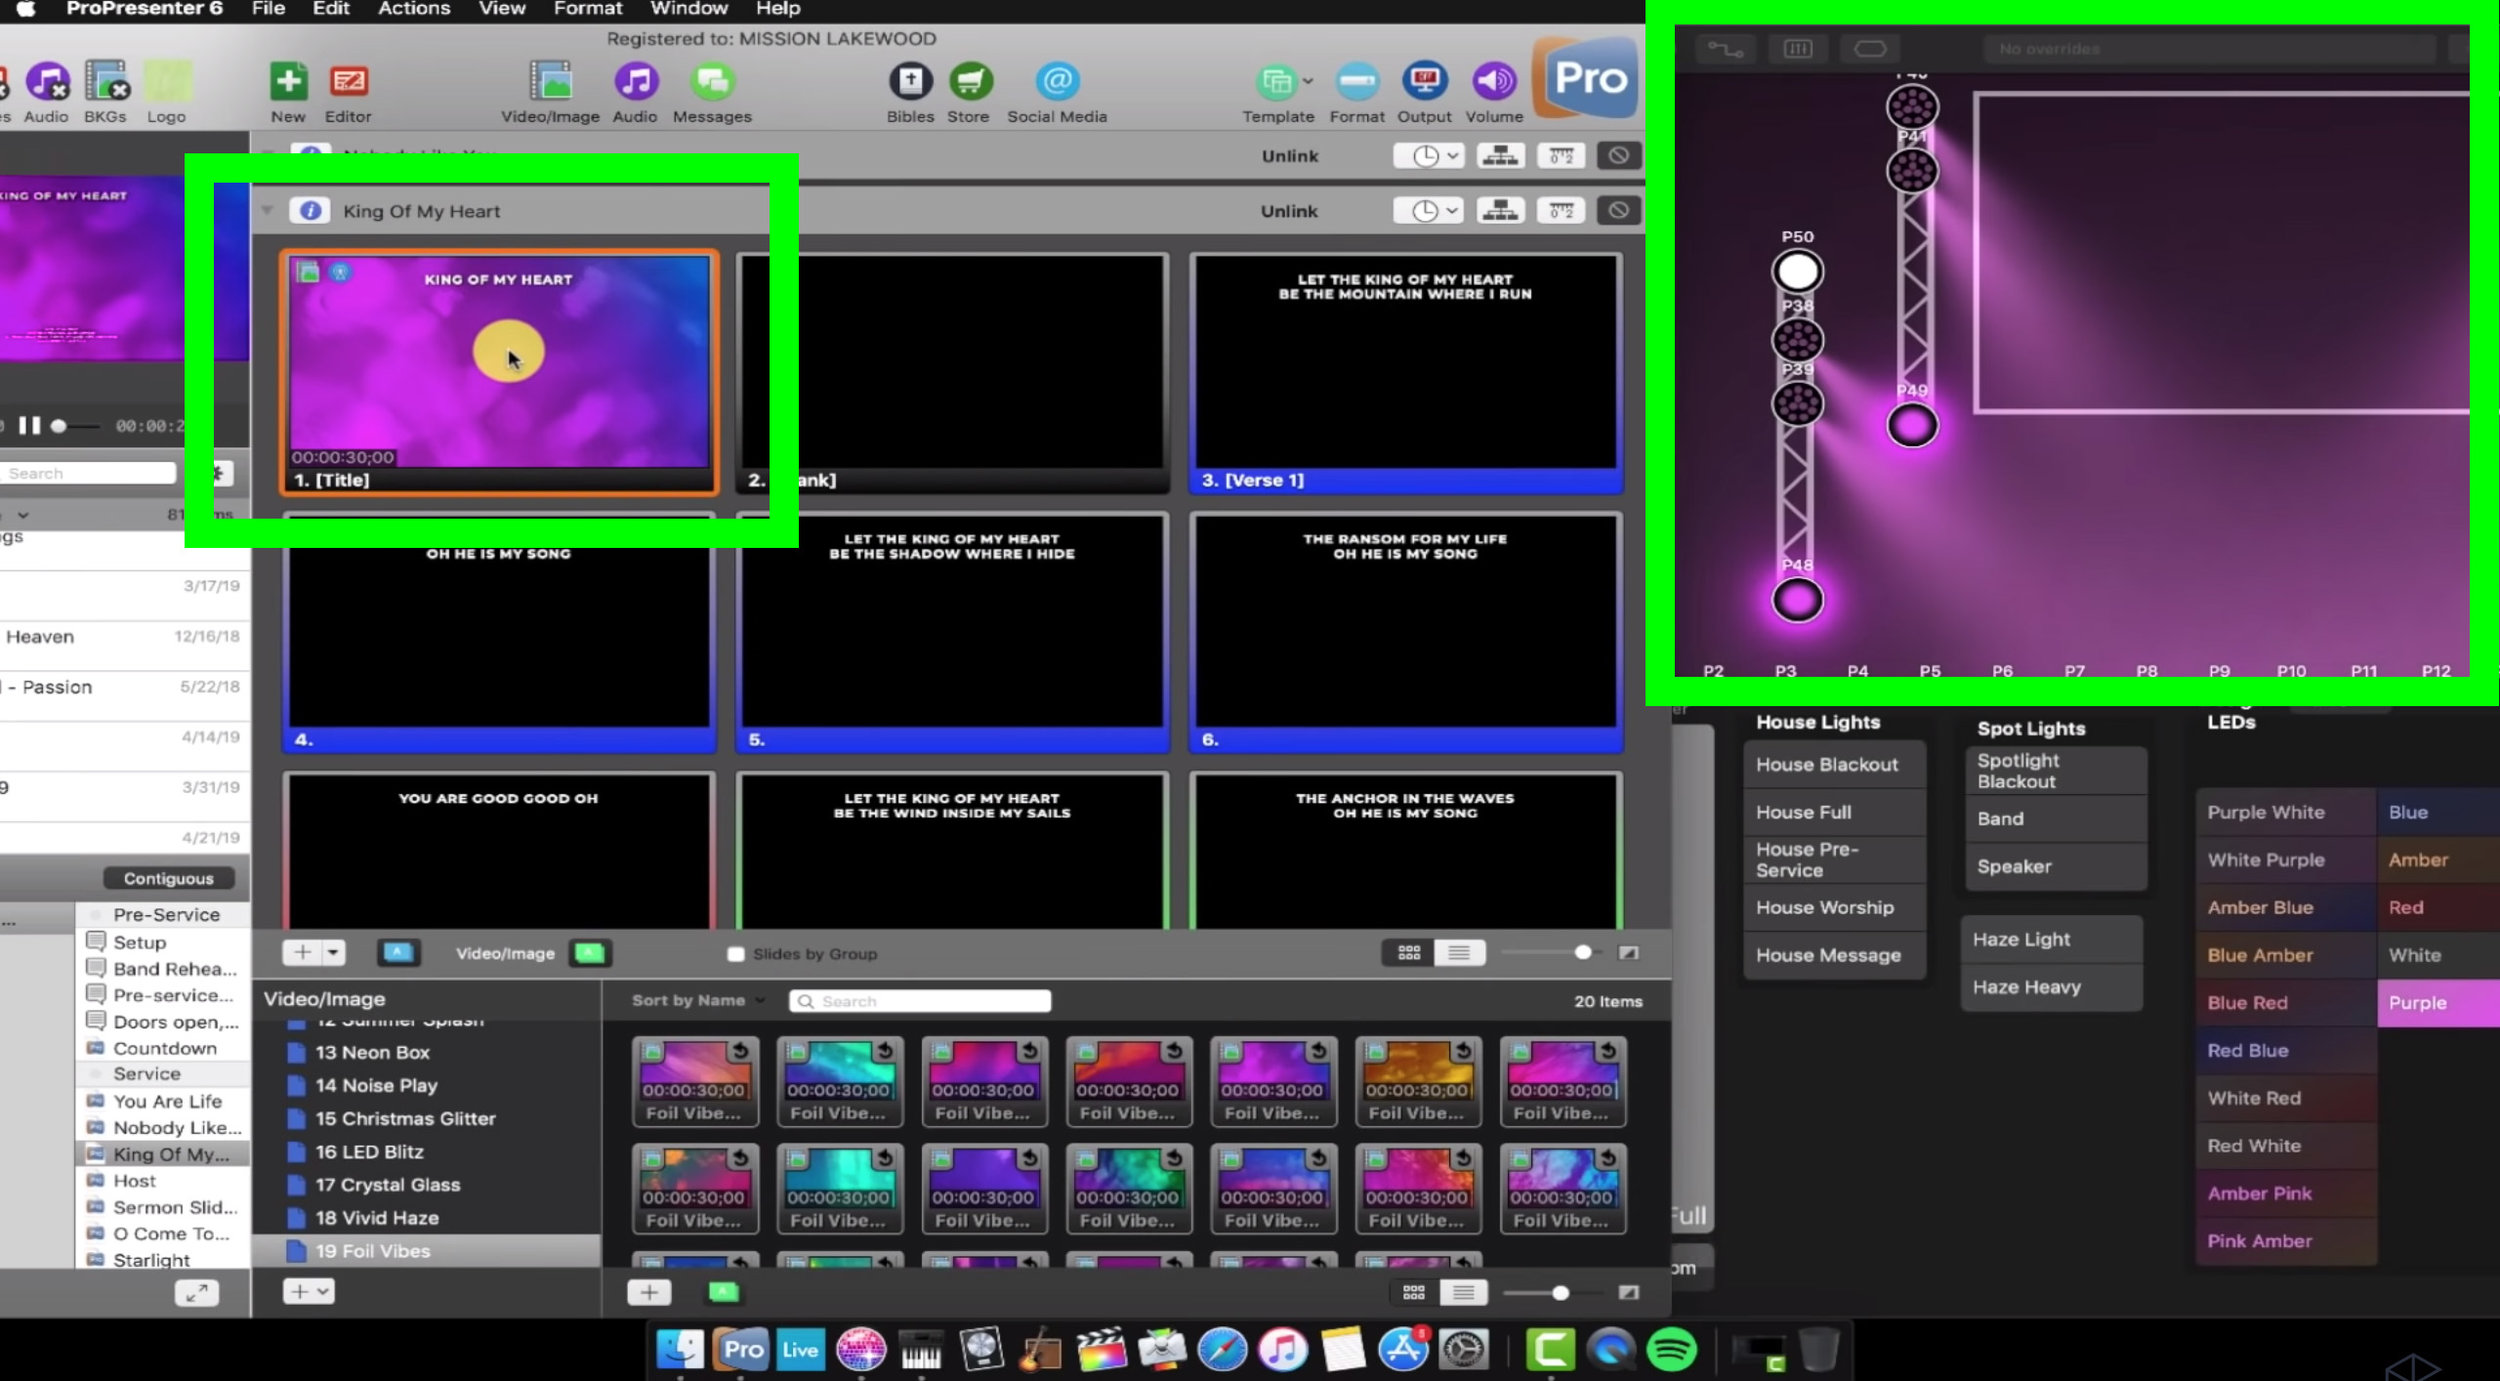
The green square on the left is ProPresenter which you click. The green square on the right shows how the stage lights will look in Lightkey.
Now we want to practice turning down the band lights during another cue.
All I need to do is go to the
Band Lights Cue in Lightkey > Right click > External Control > Find the Midi name with is C#8
Then I go to ProPresenter > Find the slide I want it to use it on > Right click > Add Cue > Communications Cue > Midi Note: On

And that is how you automate LightKey with ProPresenter. You just need to know the midi notes, you need to have them communicate to each other via the IAC driver and then just start adding whatever cues you want.
If you’re interested in continuing to develop your worship leading skills with great classes like this, I’ve created two great ways to help you become an incredible worship leader.
Worship Leaders School: A site and series of courses that covers how to lead engaging worship, how to become a great worship pastor and build systems and teams to grow your ministry.
Worship Tech School: This site is brand new, and will teach you how to be a complete ninja with the latest and greatest software for worship. Sign up to join the waitlist.
Feel free to choose one depending on your role in your ministry. Then choose a time to chat with me and we’ll connect about how these courses can help you.
My goal in this is to give you and your keyboardist a common terminology so that you can communicate more effectively, identify what sounds you want and produce a well designed performance that evokes powerful emotions and connections in your church community.
The first word I want to address is the word “warm.” Stuff is called warm all the time but it's hard to quantify what that means.
A warm sound is a pad that has this nice low-mid energy. It's not getting in the way, it's not sitting on top of what the electric guitars, vocals, bass or the kick drum might be doing. It's serving as a foundation underneath everything.
It doesn't have any of that bright sizzle on top that can distract from quieter moments. Instead, it adds a feeling of connectedness and intimacy.
Protip: One of the really important things about finding a warm a pad is to make sure it's not too static. You want there to still be some motion and energy–what we call a little bit of modulation.
Check out the example below to hear what I’m talking about.
Next, let's talk about the bright sound. This is the opposite side of the warm sound.
When I think of bright, we're talking about stuff in the higher frequency spectrum that's actually maybe above or right alongside what the guitars are doing. That has a lot of energy on the top end that's perceived as more aggressive, more powerful and it's more complex harmonically. You might still be playing in the same range on the keyboard but there are harmonic frequencies on top of it that add a little bit of extra energy.
Oftentimes with these bright synth pad sounds, you're still serving as the foundation to the mix, holding everything else together, but you're able to dynamically lift as your drummer switches to the high hat or starts washing out cymbals and as your electric guitarists start playing with more intensity. This increase in brightness from the pad goes right along with that; still serving as the foundation but rising as everyone does too.
Lastly, let's talk about the most overused buzzword right now in the worship space–the shimmer pad.
You can have a shimmery texture or quality to your pad sounds which does something really specific in the mix, but it's really easy to overuse this kind of effect and overwhelm what your vocalist or your guitarist is doing.
It’s still worth using, but you have to make sure that you clarify why you're using this type of sound and where this type of pad sound actually sits in the mix.
Check out the example below to hear the proper balance that doesn’t overwhelm everything else.
Now let’s talk about how a couple simple effects from software like Mainstage or Ableton can greatly increase the quality of your music and make them sound more like today's top worship songs.
First off, I want to talk about reverb. If you're a guitarist, I'm sure you're probably familiar with the effect that reverb can have. You can use it on keys in the same way.
Reverb adds a sense of size, depth and space to your sound. It can soften up the initial impression of what you're playing, create some room and increase the hang time of your chord.
Now, let's talk about delay. All the guitarists discovered delay in 2002, and keyboard players are just getting around to it now.
In the same way that you can change the character and the rhythmic complexity of an electric guitar with delay, you can achieve a lot of the same cool effects with piano.
This is commonly used on some slow songs where you'll hit a chord on the one, and let the delay trail sort of add that extra oomph to it. You can also use it when you're playing the piano as a lead instrument, to give you an extra bit of memorability to a bridge or something like that.
In really powerful worship moments, it can also add more texture and make the piano sound a little bit more interesting.
Lastly, I want to return to shimmer. We already talked about shimmer when it comes to a pad, but you can also apply shimmer as an effect to any sound that you have.
When I’m playing the piano all I have to do is turn on the shimmer reverb. The shimmer will swell in behind what I'm doing and then swell back down. If I'm moving through chords, it's never overwhelming the initial playing, and it feels really organic and natural.
It's a really great effect to give your keys players because it's got a nice production value element to it, it adds an ethereal ambience and it doesn't require a lot of theory knowledge to use. As long as you're not overplaying, it's going to make you sound like you know what you're doing.
So those are six fundamental terms for you and your keyboardist. My hope is that it empowers both of you to create a powerful experience for the people you’re leading.
If you want to take the next step with this training and dive deep into equipping and empowering the keyboardist in your worship band, then check out Worship Leader School. David has created an entire masterclass exclusively for members that will:
✅Give you a deep dive into the effects that we touched on today.
✅ Show you an in-depth tour of all the gear and software for this setup.
✅Explain how to communicate and work alongside your keyboard player so you have smooth transitions in worship
I’d love to chat about how this class can help you grow as a worship leader.
Feel free to setup a call here.
Talk soon.
In this article, I’m going to share ten reasons why the X32 and M32 family of mixers is the best choice for most church sound systems. I’ve worked with these mixers for over six years now, so this review comes with a lot of practical experience using these tools for worship ministry. By the end of this article, you’ll have a firm grasp on the benefits of upgrading to one of these mixers, and you’ll know whether or not you should buy one for your church.
Selecting the right keyboard rig for your worship band can be a daunting task. In this article, I’m going to walk you through the setup we use at our church plant. Rather than spending thousands of dollars on a Nord, Roland, or Yamaha keyboard, we are able to produce amazing sounds with an inexpensive MIDI keyboard and Mainstage running on a MacBook Air. Keep reading to the end and you’ll know exactly what to buy and how to set this up at your church.


